What is qq?
qq is a wrapper around batch scheduling systems designed to simplify job submission and management. It is inspired by NCBR's Infinity ABS but aims to be more decentralized and easier to extend. It also supports both PBS Pro and Slurm, while making it straightforward to add compatibility with other batch systems as needed.
Although qq and Infinity ABS share the same philosophy and use very similar commands, they share no code.
Disclaimer: qq is developed for the internal use of the Robert Vácha Lab and may not work on clusters other than those officially supported (Robox, Sokar, Metacentrum, LUMI, Karolina).
Installation
This section explains how to easily install qq on different clusters.
All installation scripts assume that you are using bash as your shell. If you use a different shell, follow this section of the manual.
Updating qq
To reinstall or update qq on a cluster, just run the installation command for the given cluster again.
Updating qq is usually safe, even if you have running qq jobs on the cluster. Jobs that are already running will continue using the old version of qq. Loop jobs will automatically switch to the updated version in their next cycle.
Installing on Robox
To install qq on the Robox cluster (computers of the RoVa Lab), log in to your desktop and run:
curl -fsSL https://github.com/Ladme/qq/releases/latest/download/qq-robox-install.sh | bash
This command downloads the latest version of qq, installs it to your home directory on your desktop, and then installs it to the home directory of the computing nodes.
To finish the installation, either open a new terminal or source your .bashrc file.
Note: This does not install qq on other desktops with separate local home directories.
If you want to use qq on other desktops, you'll need to install it there separately.
(Not installing it there however helps prevent accidentally running jobs on someone else's desktop.)
Installing on Sokar
To install qq on the Sokar cluster (managed by NCBR), log in to sokar.ncbr.muni.cz and run:
curl -fsSL https://github.com/Ladme/qq/releases/latest/download/qq-sokar-install.sh | bash
This downloads the latest version of qq and installs it to the shared home directory of the cluster nodes.
To complete the installation, open a new terminal or source your .bashrc file.
Installing on Metacentrum
To install qq on Metacentrum, log in to any Metacentrum frontend and run:
curl -fsSL https://github.com/Ladme/qq/releases/latest/download/qq-metacentrum-install.sh | bash
This command downloads the latest version of qq and installs it into your home directory on brno12-cerit. The script then adds qq's location on this storage to your PATH across all Metacentrum machines.
Because qq runs significantly slower when stored on non-local storage, the installation script also configures the .bashrc files of all Metacentrum machines to automatically copy qq from brno12-cerit to their local scratch space on login. This improves the responsiveness of qq operations.
To complete the installation, either open a new terminal or source your .bashrc file.
Note: qq is known not to work on the Metacentrum machine
samson. When running jobs on Metacentrum, submit them with the option--props=^cl_samsonto ensure they are not scheduled onsamson.
Installing on Karolina
To install qq on the Karolina supercomputer (IT4Innovations), log in to karolina.it4i.cz and run:
curl -fsSL https://github.com/Ladme/qq/releases/latest/download/qq-karolina-install.sh | bash
This downloads the latest version of qq and installs it to the shared home directory of the cluster nodes.
To complete the installation, open a new terminal or source your .bashrc file.
Installing on LUMI
To install qq on the LUMI supercomputer, log in to lumi.csc.fi and run:
curl -fsSL https://github.com/Ladme/qq/releases/latest/download/qq-lumi-install.sh | bash
This downloads the latest version of qq and installs it to the shared home directory of the cluster nodes.
To complete the installation, open a new terminal or source your .bashrc file.
Installing manually
Installing a pre-built version
To install a pre-built version of qq on a single computer or on several computers sharing the same home directory, run:
curl -fsSL https://github.com/Ladme/qq/releases/latest/download/qq-install.sh | \
bash -s -- $HOME https://github.com/Ladme/qq/releases/latest/download/qq-release.tar.gz
To finish the installation, either open a new terminal or source your .bashrc file.
Installing a pre-built version for other shells
If you're not using bash, you'll need to modify the qq-install.sh script.
First, download it:
curl -OL https://github.com/Ladme/qq/releases/latest/download/qq-install.sh
Then edit this line to match your shell's RC file:
BASHRC="${TARGET_HOME}/.bashrc"
# For example, if you use zsh:
BASHRC="${TARGET_HOME}/.zshrc"
Next, make the script executable and run it:
chmod u+x qq-install.sh
./qq-install.sh $HOME https://github.com/Ladme/qq/releases/latest/download/qq-release.tar.gz
Building qq from source
To build and install qq yourself, you'll need git and uv installed.
First, clone the qq repository:
git clone git@github.com:Ladme/qq.git
Then navigate to the project directory and install the dependencies:
cd qq
uv sync --all-groups
Build the package using PyInstaller:
uv run pyinstaller qq.spec
PyInstaller will create a directory named qq inside dist. Copy that directory wherever you want and add it to your PATH.
If you want the qq cd command to work, add the following shell function to your shell's RC file:
qq() {
    if [[ "$1" == "cd" ]]; then
        for arg in "$@"; do
            if [[ "$arg" == "--help" ]]; then
                command qq "$@"
                return
            fi
        done
        target_dir="$(command qq cd "${@:2}")"
        cd "$target_dir" || return
    else
        command qq "$@"
    fi
}
If you want the autocomplete for the qq commands to work, add the following line to your shell's RC file:
eval "$(_QQ_COMPLETE=bash_source qq)"
To finish the installation, either open a new terminal or source your .bashrc file.
Running a job
This section demonstrates how to run a basic qq job by performing a simple Gromacs simulation on the robox cluster. This assumes that you have already successfully installed qq on the cluster.
1. Preparing an input directory
Start by creating a directory for the job on a shared storage (you can also submit from a local storage on your computer but that is not recommended). This directory should contain all necessary simulation input files — in this example, an mdp, gro, cpt, ndx,top, and itp files.
2. Preparing a run script
Next, prepare a run script that creates a tpr file from the input files using gmx grompp, and then runs the simulation with gmx mdrun. We’ll configure the simulation to use 8 OpenMP threads.
Note that all qq run scripts must start with the correct shebang line:
#!/usr/bin/env -S qq run
A complete example of a run script:
#!/usr/bin/env -S qq run

# activate the Gromacs module
metamodule add gromacs/2024.3-cuda

# prepare a TPR file
gmx_mpi grompp -f md.mdp -c eq.gro -t eq.cpt -n index.ndx -p system.top -o md.tpr

# run the simulation using 8 OpenMP threads
gmx_mpi mdrun -deffnm md -ntomp 8 -v
Hint: You can use the
qq shebangcommand to easily add the qq run shebang to your script.
Save this file as run_job.sh and make it executable:
chmod u+x run_job.sh
3. Submitting the job
Submit the job using qq submit:
qq submit run_job.sh -q cpu --ncpus 8 --walltime 1d
This submits run_job.sh to the cpu queue, requesting 8 CPU cores and a walltime of one day. All other parameters are determined by the queue or qq’s default settings.
Note that on Karolina and LUMI, you also have to specify the
--accountoption, providing the ID of the project you are associated with.
The batch system then schedules the job for execution. Once a suitable compute node is available, the job runs through qq run, a wrapper around bash that prepares the working directory, copies files, executes the script, and performs cleanup. You can read more about how exactly this works in this section of the manual.
4. Inspecting the job
After submission, you can inspect the job using qq info, access its working directory on the compute node with qq go, or terminate it using qq kill. For an overview of all qq commands, see this section of the manual.
5. Getting the results
Once the job finishes, the resulting Gromacs output files will be transferred from the working directory back to the original input directory. You can verify that everything completed successfully using qq info.
If your job failed (crashed) or was killed, only the qq runtime files are transferred to the input directory to ensure it remains in a consistent state. In these cases, the working directory on the compute node is preserved, allowing you to inspect the job files directly using qq go or to copy them back to the input directory using qq sync. On some systems, you may also want to explicitly delete the working directory afterward — to do this, use qq wipe.
Run scripts
For more complex setups — particularly for running Gromacs simulations in loops — qq provides several ready-to-use run scripts. These scripts are fully compatible with all qq-supported clusters, including Metacentrum-family clusters, Karolina, and LUMI.
Job types
qq currently supports two job types: standard and loop.
standard jobs are the default type. Any job for which you don't specify a job-type when submitting is considered standard. Read more about standard jobs here.
loop jobs automatically submit their continuation before finishing. Read more about them here.
Standard jobs
A standard job is the default qq job type. This section describes the full lifecycle of a standard qq job.
1. Submitting the job
Submitting a qq job is done using qq submit.
qq submit submits the job to the batch system and generates a qq info file containing metadata and details about the job. This info file is named after the submitted script, has the .qqinfo extension, and is located in the input directory (often also called the submission or, somewhat confusingly, job directory).
Once submitted, the batch system takes over, finding a suitable place and time to execute your job. As a user, you don't need to do anything else except wait for the job to run.
2. Preparing the working directory
When the batch system allocates a machine for your job, the qq run environment takes over. It first prepares a working directory for the job on the execution node.
If you requested the job to run in the input directory (by submitting with --workdir=input_dir or the equivalent --workdir=job_dir), the input directory is used directly as the working directory, and no additional setup is required.
If you requested the job to run on scratch (the default option for all environments), a working directory is created inside your allocated scratch space, and all files and directories in the input directory are copied there — except for the qq runtime files (.qqinfo and .qqout) and the "archive" directory if you are running a loop job (discussed later). During submission, you can also specify additional files you explicitly do not want to copy to the working directory.
Once the working directory is ready, qq updates the info file to mark the job state as running. Only then is your submitted script executed.
In all environments supported by qq, the working directory is placed on scratch storage by default. This is typically not only faster but also safer — qq generally recommends keeping the job execution environment separate from the input directory until the job finishes successfully. This ensures that, if something goes wrong, your original input data remain untouched — no matter what your executed script did. However, all qq-supported environments also allow you to use
--workdir=input_dirif you prefer to run directly in the input directory.
3. Executing the script
After preparing the working directory, submitted script is executed using bash.
The script should exit with code 0 if everything ran successfully, or a non-zero code to indicate an error. The exit code is passed back to qq, which sets the appropriate job state (finished for 0, failed for anything else).
Standard output from your script is saved to a file named after your script with the .out extension. Standard error output is stored in a similar file with the .err extension.
4. Finalizing execution
After the script finishes, qq performs cleanup.
If your job ran in the input directory, cleanup is simple: qq updates the job's state (finished or failed) in the qq info file, and the execution ends.
If your job ran on scratch, cleanup depends on the script's exit code.
If the script finished successfully (exit code 0), all files from the working directory are copied back to the input directory, and the working directory is deleted. Finally, qq sets the job state to finished.
If the job failed (exit code other than 0), the working directory is left intact on the execution machine for inspection (you can open it using qq go, download it using qq sync, or delete it using qq wipe). Only the qq runtime files with file extensions .err and .out are copied to the input directory so you can easily check what exactly went wrong during the execution. Finally, the job state is set to failed.
Regardless of the result, qq creates an output file (named after your script with the .qqout extension) in the input directory. This file contains basic information about what qq did and when the job finished. Depending on the batch system, this file may appear either after job completion (PBS) or immediately after the job starts being executed (Slurm).
The decision not to copy data from failed runs back to the input directory is a deliberate part of qq's design philosophy. It prevents temporary or partially written files from polluting the input directory and ensures you can rerun the job cleanly after fixing the issue. In some cases, your script may even modify input files during execution and copying them back after a failure would overwrite data necessary for rerun. If you need anything from a failed run, you can copy selected files — or the entire working directory — using
qq sync.
Killing a qq job
If your job is killed (either manually via qq kill or automatically by the batch system, for example if it exceeds walltime), all files remain in the working directory on the execution machine and only qq runtime files are copied to the input directory. qq then stops the running script and marks the job state as killed.
Submitting the next job
After a job has completed successfully, you may want to submit a new one: for example, to proceed to the next stage of your workflow. If you try to submit another qq job from the same directory as the previous one, you will however encounter an error:
ERROR Detected qq runtime files in the submission directory. Submission aborted.
This behavior is intentional. qq enforces a one-job-per-directory policy to promote reproducibility and maintain organized workflows. Each job should reside in its own dedicated directory. (You can always override this policy by using qq clear --force but that is not recommended.)
If your previous job crashed or was terminated and you wish to rerun it, you can remove the existing qq runtime files using qq clear.
Even analysis jobs that operate on results from earlier runs are recommended to be submitted from their own directories. Although qq copies only the files and directories located in the job’s input directory by default, you can explicitly include additional files or directories using the
--includeoption ofqq submit. These included items are copied to the working directory for the duration of the job, but they are not copied back after job completion. This allows you to maintain a clean one-job-per-directory workflow while still accessing any extra data your analysis requires.Example directory structure:
simulation/1_run→ directory for the simulation job
simulation/2_analysis→ directory for the analysis job, submitted with--include ../1_run
Additional notes
- Most operations during working directory setup and cleanup are automatically retried in case of errors. This helps prevent job crashes caused by temporary storage or network issues. If an operation fails, qq waits a few minutes and retries — up to three attempts. After three failures, qq stops and reports an error. Note that qq does not retry execution of your script itself.
- If your job fails with an exit code between 90–99, this usually means a qq operation failed. Check the qq output file (
.qqout) for more details. An exit code of 99 indicates a critical or unexpected error, which usually means a bug in qq. Please report such cases.
Loop jobs
Loop jobs are jobs that automatically submit their continuation at the end of execution. This section describes how they differ from standard jobs. Please read the section about standard jobs first — otherwise, this may be difficult to follow.
To turn a job into a loop job, you must set two qq submit options:
job-typetoloop, andloop-endto specify the last cycle of the loop job.
Loop job cycles
Each loop job consists of multiple cycles. Every cycle is a separate job from the batch system's perspective. Before a cycle finishes, it submits the next one and then ends. The next cycle continues where the previous one left off.
You can control the starting cycle using the loop-start submission option (defaults to 1). To set the final cycle, use the loop-end option. The cycle specified as loop-end will be the last one executed.
Archive directory
Each loop job creates an archive directory inside the input directory. This directory is not copied to the job's working directory, so it can safely hold large amounts of data. In loop jobs, the archive serves two main purposes:
- to identify and initialize the current cycle of the loop job,
- to store data from previous cycles without copying them to the working directory.
You can control the archive directory's name using the archive submission option (default: storage).
Archived files should follow a specific filename format that includes the job cycle number they belong to. You can define this format using the archive-format submission option (default: job%04d). In this format, %04d is replaced by the cycle number — for example, job0001 for cycle 1, job0002 for cycle 2, job0143 for cycle 143 and so on.
When a new cycle is submitted (either manually or automatically by the previous one), qq sets the current cycle number based on the highest cycle number found in the names of the archived files. In other words: in each cycle of a loop job, at least one file must be added to the archive whose name includes the number of the next cycle. Otherwise, the job submission will fail with an error.
(If no archive directory or archived files exist, the cycle number defaults to loop-start.)
Working with the archive
You typically should not transfer files from and to the archive directly inside your submitted script. If you follow the proper naming etiquette, the qq run environment will handle all archiving operations for you.
At the start of each cycle, after copying files from the input directory to the working directory, qq run checks the archive and automatically copies all files associated with the current cycle into the working directory. For example, if the current cycle number is 8 and archive-format is job%04d, any file in the archive containing job0008 in its name will be automatically copied to the working directory. These files can then be used to initialize the next cycle of the job.
After the submitted script finishes successfully, qq moves all files matching the archive-format (for any cycle) to the archive directory. For example, if the 8th cycle produces the files job0008.txt, job0008.dat, and job0009.init, and the archive format is job%04d, all three files will be moved to the archive. Only after these files are archived are the remaining files in the working directory moved to the input directory. This ensures that archived files don't clutter the input directory or get copied to the next cycle's working directory.
In summary, unlike with Infinity, you do not need to explicitly fetch files from and to the archive, you just need to name them accordingly and qq will archive them automatically.
If the script fails or the job is killed, no archival is performed. As with standard jobs, all files remain in the working directory and only qq runtime files are copied to the input directory.
Resubmiting
After the current cycle finishes the execution of the submitted script, archives the relevant files, and copies the other files to the input directory, qq resubmits the job. This means that the next cycle is submitted from the original input directory. The resubmission may occur from either the original input machine or the current main execution node, depending on the batch system.
The new job (the next cycle) waits for the previous one to finish completely before starting. When it begins, even before creating its working directory, qq archives runtime files from the previous cycle, renaming them according to the specified archive-format.
If the current cycle of the loop job corresponds to loop-end, no resubmission is performed.
Extending a loop job
Sometimes, after a job completes N cycles, you may realize you need M more. To extend the job, simply submit it again from the same input directory with loop-end set to N + M, either on the command line or in the submission script.
Importantly: you do not need to delete any runtime files from the previous cycle — and you probably shouldn't. qq submit can detect that you are extending an existing loop job and will handle the continuation correctly. This has the added benefit that the runtime files from the Nth cycle will be properly archived.
Forcing qq to not resubmit
You can manually force qq to not submit the next cycle of a loop job, even if the current cycle number has not yet reached loop-end, by returning the value of the environment variable QQ_NO_RESUBMIT from within the script:
#!/usr/bin/env -S qq run

# qq job-type loop
# qq loop-end 100
# qq archive storage
# qq archive-format md%04d

...

# if a specific condition is met, do not resubmit but finish successfully
if [ -n "${SOME_CONDITION}" ]; then
    exit "${QQ_NO_RESUBMIT}"
fi

exit 0
If qq detects this exit code, it will not submit the next cycle of the loop job. The current cycle will still be marked as successfully finished (exit code 0).
Working directories
A working directory is the directory where a qq job is actually executed. qq copies the data from the input directory to the working directory, executes the submitted script there, and then copies the data back.
Typically, the working directory resides on a compute node’s local storage, but it can also be on a shared filesystem — or even be the same as the input directory.
How the working directory is created depends on the batch system and the specific environment.
Clusters of the Metacentrum family
On clusters of the Metacentrum family (such as robox, sokar, and of course all Metacentrum clusters), the working directory is, by default, created on the local scratch storage of the main compute node assigned to the job. You can, however, explicitly choose to use SSD scratch, shared scratch, in-memory scratch (if available), or even use the input directory itself as the working directory.
To control where the working directory is created, use the work-dir option (or the equivalent spelling workdir) of the qq submit command:
--work-dir=scratch_local– Default option on Metacentrum-family clusters. Creates the working directory on an appropriate local scratch storage. Depending on the setup, it may also be created on SSD scratch.--work-dir=scratch_ssd– Creates the working directory on SSD-based scratch storage.--work-dir=scratch_shared– Creates the working directory on shared scratch storage accessible by multiple nodes.--work-dir=scratch_shm– Creates the working directory in RAM (in-memory scratch). Useful for jobs requiring extremely fast I/O. Note that if your job fails, your data are immediately lost.--work-dir=input_dir– Uses the input directory itself as the working directory. Files are not copied anywhere. Can be slower for I/O-heavy jobs.--work-dir=job_dir– Same asinput_dir.
Not all scratch types are available on every compute node. Use
qq nodesto see which storage options are supported by each node.
For more details on scratch storage types available on Metacentrum-family clusters, visit the official documentation.
Specifying the working directory size
Local, SSD, and shared scratch
By default, qq allocates 1 GB of storage per CPU core when using a scratch directory. If you need a different amount of storage, you can adjust it using the following qq submit options:
--work-size-per-cpu(or--worksize-per-cpu) — specifies the amount of storage per requested CPU core.--work-size-per-node(or--worksize-per-node) — specifies the amount of storage per requested compute node.--work-size(or--worksize) — specifies the total amount of storage for the entire job.
--work-size-per-nodeoverrides--work-size-per-cpu.--work-sizeoverrides both--work-size-per-cpuand--work-size-per-node.
Example:
qq submit --work-size=16gb (...)
# or
qq submit --work-size-per-cpu=2gb (...)
In-memory scratch
If you use --work-dir=scratch_shm, you should allocate memory instead of work-size, using the mem, mem-per-node, or mem-per-cpu options. Make sure the total allocated memory covers both your program’s memory usage and your in-memory storage needs. By default, qq allocates 1 GB of RAM per CPU core for all jobs.
--mem-per-nodeoverrides--mem-per-cpu.--memoverrides both--mem-per-cpuand--mem-per-node.
Example:
qq submit --mem=32gb (...)
# or
qq submit --mem-per-cpu=4gb (...)
Not requesting scratch
If you use --work-dir=input_dir (or --work-dir=job_dir), the available storage is limited by your shared filesystem quota.
Karolina supercomputer
On the Karolina supercomputer, the working directory is, by default, created inside your project directory on the shared scratch storage. You can, however, also choose to use the input directory itself as the working directory.
To control where the working directory is created, use the work-dir option (or the equivalent spelling workdir) of the qq submit command:
--work-dir=scratch– Default option on Karolina. Creates the working directory on the shared scratch storage.--work-dir=input_dir– Uses the input directory itself as the working directory. Files are not copied anywhere. If you use this option, it is strongly recommended to submit from the scratch storage.--work-dir=job_dir– Same asinput_dir.
Recommendation:
- Submit jobs from your project's mounted storage (
/mnt/...). With the default--work-diroption, qq automatically copies your data to scratch, executes the job there, and then copies the results back to your input directory.- The size of the working directory on Karolina is limited by your filesystem quota, so you do not need to specify the
work-sizeoption.
LUMI supercomputer
On the LUMI supercomputer, the working directory is, by default, created inside your project directory on the shared scratch storage. You can, however, also choose to create the working directory on the flash storage or use the input directory itself as the working directory.
To control where the working directory is created, use the work-dir option (or the equivalent spelling workdir) of the qq submit command:
--work-dir=scratch– Default option on LUMI. Creates the working directory on the shared scratch storage.--work-dir=flash– Creates the working directory on the shared flash storage. This storage can be faster for I/O-heavy jobs. Note that on LUMI, you are billed for the amount of storage you use and flash storage is much more expensive than scratch storage!--work-dir=input_dir– Uses the input directory itself as the working directory. Files are not copied anywhere. If you use this option, it is recommended to submit from the scratch or flash storage.--work-dir=job_dir– Same asinput_dir.
Recommendations:
- Submit jobs from your project's space (
/project/<project_id>). With the default--work-diroption, qq automatically copies your data to scratch, executes the job there, and then copies the results back to your input directory.- The size of the working directory on LUMI is limited by your filesystem quota, so you do not need to specify the
work-sizeoption.- IMPORTANT! On LUMI, you are billed for the amount of storage you use! qq only clears the working directory if the job is successfully completed. If your job fails, you MUST clear the working directory yourself (see
qq wipe), otherwise you will get billed for it!
For more details on storage types available on LUMI, visit the official documentation.
Job states
There are three types of job states that qq uses: batch states, naïve states, and real states.
- Batch states describe the job's state according to the batch system itself.
- Naïve states are recorded in qq info files.
- Real states combine both sources of information to report the most accurate job status.
Batch states are shown in the output of qq jobs and qq stat, while real states are used by all other commands that report a job's status.
Below are the meanings of the most common real states you may encounter:
- queued – The job has been submitted and is waiting in the queue for execution.
- held – The job has been submitted but is blocked from execution for some reason.
- booting – The job has been allocated computing nodes and the working directory is being prepared, but it is not yet ready.
- running – The job is currently running; its script is being executed or the execution is being finalized.
- exiting –
qq runhas finished executing or is submitting the next job cycle (for loop jobs), but the batch system hasn't completed the job yet. - finished – The job completed successfully (exit code 0) and data from the working directory were transferred to the input directory.
- failed – The job's execution failed (exit code > 0).
- killed – The job was terminated by the user, an administrator, or the batch system.
- in an inconsistent state – qq believes the job to be in a specific state which is incompatible with what the batch system reports. This usually indicates either a bug or that the job was manipulated outside qq.
- unknown – The job is in a state that qq does not recognize.
Runtime files
qq uses four types of runtime files, each with one of the following extensions: .qqinfo, .out, .err, and .qqout.
qqinfo files
A .qqinfo file (also called a "qq info file") is created after submission by qq submit. It stores information used to track the job submitted from that directory. Each qq job requires its own info file for management and control.
Do NOT move, modify, or delete qq info files manually.
Always use qq commands such asqq killorqq clearto manage them safely.
Moving, editing, or removing a qq info file while a job is running will cause the job to crash, and you may lose its data.
out files
A .out file contains the standard output from the script executed as a qq job. This file is created when the job starts running in the working directory and is copied to the input directory once the job is completed.
err files
A .err file contains the standard error output from the script executed as a qq job. Like the .out file, it is created when the job starts running in the working directory and is copied to the input directory once the job is completed.
qqout files
A .qqout file contains the output from the qq run execution environment. It includes technical information about the job's progress and internal qq operations. If your batch system is PBS, this file is only placed into the input directory after the job is completed. If your batch system is Slurm, this file is available after the job starts running.
Environment variables
When a qq job is submitted, several environment variables are automatically set and can be used within the submitted script.
QQ_ENV_SET: indicates that the job is running inside the qq environment (always set totrue)QQ_INPUT_MACHINE: name of the input machine from which the job was submittedQQ_INPUT_DIR: absolute path to the job's input directory on the input machineQQ_INFO: absolute path to the qq job's info file on the input machineQQ_BATCH_SYSTEM: name of the batch system used to schedule and execute the jobQQ_NNODES: the total number of allocated compute nodesQQ_NCPUS: the total number of allocated CPU coresQQ_NGPUS: the total number of allocated GPU coresQQ_WALLTIME: the walltime of the job in hours
If the QQ_DEBUG environment variable is set when running qq submit, its value is propagated to the job environment as well. This turns on the debug mode, dramatically increasing the verbosity of qq run.
If the job is a loop job, the following additional environment variables are also set:
QQ_LOOP_CURRENT: current cycle number of the loop jobQQ_LOOP_START: first cycle of the loop jobQQ_LOOP_END: last cycle of the loop jobQQ_ARCHIVE_FORMAT: filename format used for archived filesQQ_NO_RESUBMIT: exit code that can be returned from the body of the script to indicate that the next cycle of the job should not be submitted
Apart from the variables listed here and those provided by the batch system itself, no other environment variables can be guaranteed to be propagated from the submission environment to the job environment.
Additional internal environment variables may be set, but these are not intended for public use and may change or be removed in future versions of qq.
Commands
qq provides a range of commands for submitting, executing, monitoring, and managing your jobs, as well as for displaying information about available compute nodes and submission queues. This section describes how to use each of them.
Each command is run in the terminal using the following syntax:
qq [COMMAND] [ARGS] [OPTIONS]
For example:
qq info 123456 -s
prints a short summary of the job with ID 123456.
To see a list of all available qq commands, simply type:
qq
For detailed information about a specific command, use:
qq [COMMAND] --help
qq cd
The qq cd command is used to navigate to the input directory of a job. It is qq's equivalent of Infinity's pgo when used with a job ID.
Quick comparison with pgo
- Unlike
pgo,qq cddoes not have a dual function.
pgocan either open a new shell on the job's main node or navigate to the job's input directory depending on the arguments provided.qq cd, on the other hand, always navigates to the input directory of the specified job in the current shell. It never opens a new shell.- If you want to open a shell in the job's working directory instead, use
qq go.
Description
Changes the current working directory to the input directory of the specified job.
qq cd [OPTIONS] JOB_ID
JOB_ID — Identifier of the job whose input directory should be entered.
Examples
qq cd 123456
Changes the current shell's working directory to the input directory of the job with ID 123456. You can use either the short job ID or the full ID including the batch server address.
Notes
- Works with any job type, including those not submitted using
qq submit.
qq clear
The qq clear command is used to remove qq runtime files from the current directory. It is qq's equivalent of Infinity's premovertf.
Quick comparison with premovertf
qq clearchecks whether the qq runtime files belong to an active or successfully completed qq job.
- If they do, the files are not deleted (if you really want to delete them, you have to use the
--forceflag).- If they do not, the files are deleted without asking for confirmation.
- In contrast,
premovertfsimply lists the files and always asks for confirmation before deleting them (unless run aspremovertf -f).
Description
Deletes qq runtime files from the current directory.
qq clear [OPTIONS]
Options
--force — Force deletion of all qq runtime files, even if they belong to active or successfully completed jobs.
Examples
qq clear
Deletes all qq runtime files (files with extensions .out, .err, .qqinfo, .qqout) from the current directory, provided these files are not associated with any job or belong to a job that has been killed or has failed. If multiple jobs are represented in the directory, only files related to killed or failed jobs are deleted. This helps prevent accidental removal of files from running or successfully finished jobs.
qq clear --force
Deletes all qq runtime files from the current directory, regardless of their job state. In other words, all files with extensions .out, .err, .qqinfo, and .qqout will be removed. This is dangerous — only use the --force flag if you are absolutely sure you know what you are doing!
Notes
- You should not delete the
.qqinfofile of a running job, as this will cause the job to fail!
qq go
The qq go command is used to navigate to the working directory of a job. It is qq's equivalent of Infinity's pgo when used in an input directory.
Quick comparison with pgo
- Unlike
pgo,qq godoes not have a dual function.
pgocan either open a new shell on the job's main node or navigate to the job's input directory depending on the arguments provided.qq go, on the other hand, always opens a new shell in the job's working directory (on the job's main node, if available).- If you want to navigate to the input directory instead, use
qq cd.- If you use
qq gowith a job ID, a new shell in the job's working directory will be opened.qq goalways attempts to access the job's working directory if it exists, even if the job has failed or been killed — no--forceoption is required.
Description
Opens a new shell in the working directory of the specified qq job, or in the working directory of the job submitted from the current directory.
qq go [OPTIONS] JOB_ID
JOB_ID — Identifier of the job whose working directory should be entered. This argument is optional.
If JOB_ID is not provided, qq go searches for qq jobs in the current directory. If multiple matching jobs are found, qq go opens a shell for each one in turn.
Examples
qq go 123456
Opens a new shell in the working directory of the job with ID 123456 on its main working node. You can use either the short job ID or the full ID including the batch server address. If the job does not exist, is not a qq job, its info file is missing, or the working directory no longer exists, the command exits with an error. If the job is not yet running, the command waits until the working directory is ready.
qq go
Opens a new shell in the working directory of the job whose info file is present in the current directory. If multiple suitable jobs are found, qq go opens a shell for each job in turn.
Notes
- Uses
cdfor local directories orsshfor remote hosts. - Does not change the working directory of the current shell; it always opens a new shell at the destination.
qq info
The qq info command is used to monitor a qq job's state and display information about it. It is qq's equivalent of Infinity's pinfo.
Quick comparison with pinfo
- You can use
qq infowith a job ID to obtain information about a qq job without having to navigate to its input directory.- Unlike
pinfo,qq infofocuses only on the most important details about a job.
The output is intentionally compact and easier to read.
Description
Displays information about the state and properties of the specified qq job, or of qq jobs found in the current directory.
qq info [OPTIONS] JOB_ID
JOB_ID — Identifier of the job to display information for. This argument is optional.
If JOB_ID is not provided, qq info searches for qq jobs in the current directory. If multiple jobs are found, qq info prints information for each job in turn.
Options
-s, --short — Display only the job ID and the current state of the job.
Examples
qq info 740173
Displays the full information panel for the job with ID 740173. You can use either the short ID or the full ID including the batch server address. This only works if the job is a qq job with a valid and accessible info file, and the associated batch server is reachable from the current machine.
This is what the output might look like:
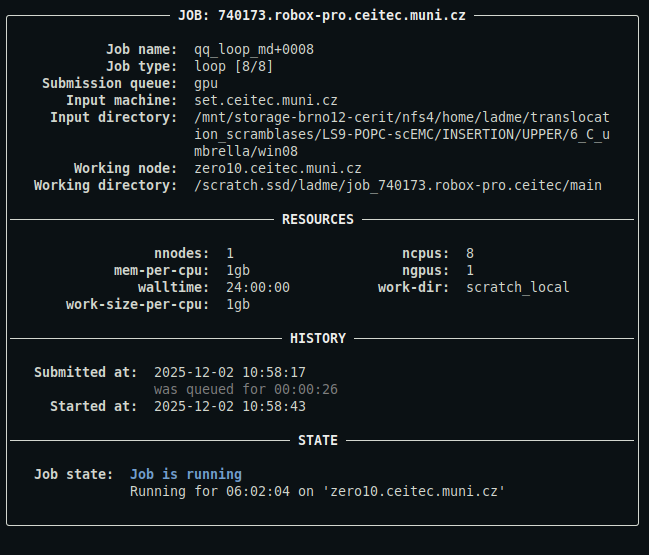
For a detailed description of the output, see below.
qq info
Displays the full information panel for all jobs whose info files are present in the current directory.
This is what the output might look like:
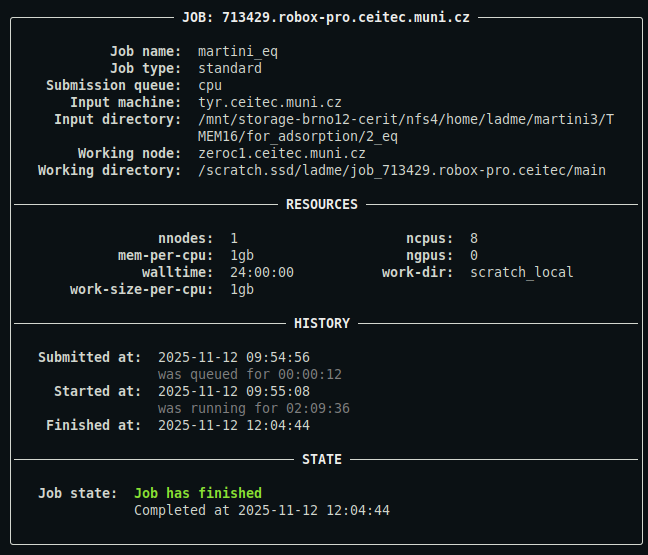
For a detailed description of the output, see below.
qq info -s
Displays short information for all jobs whose info files are present in the current directory. Only the jobs' full IDs and their current states are shown.
Description of the output
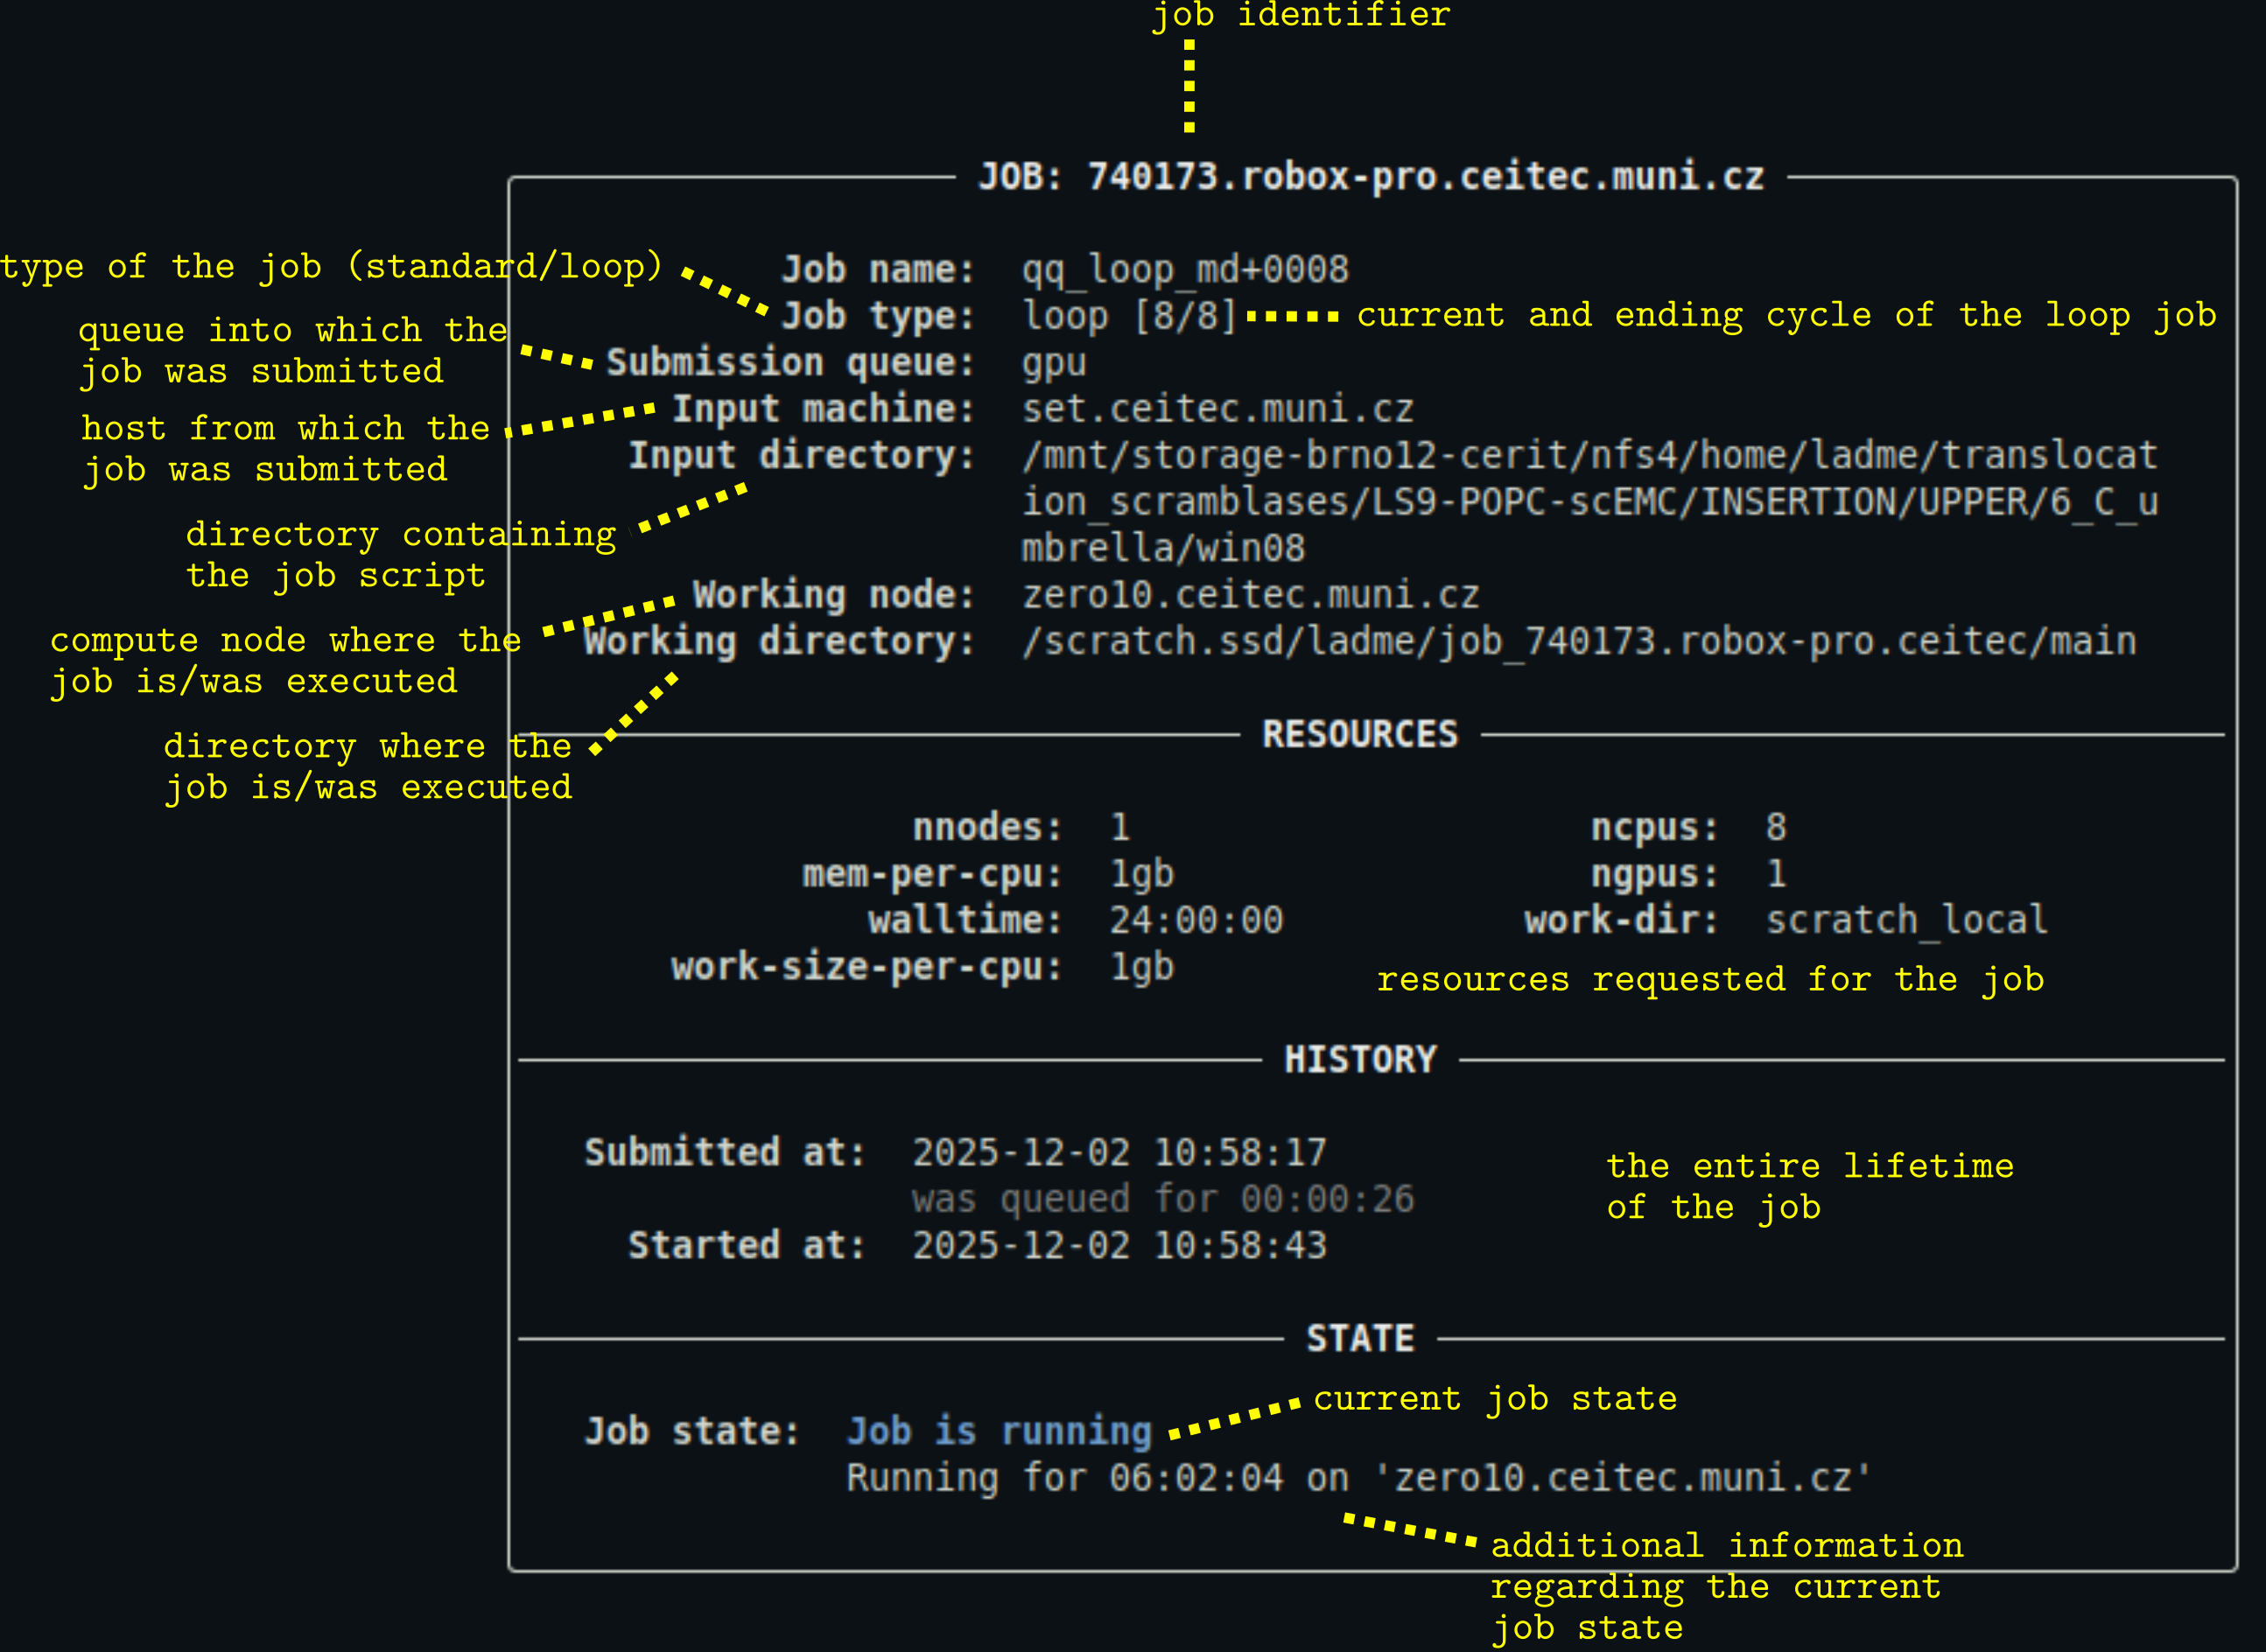
- You can customize the appearance of the output using a configuration file.
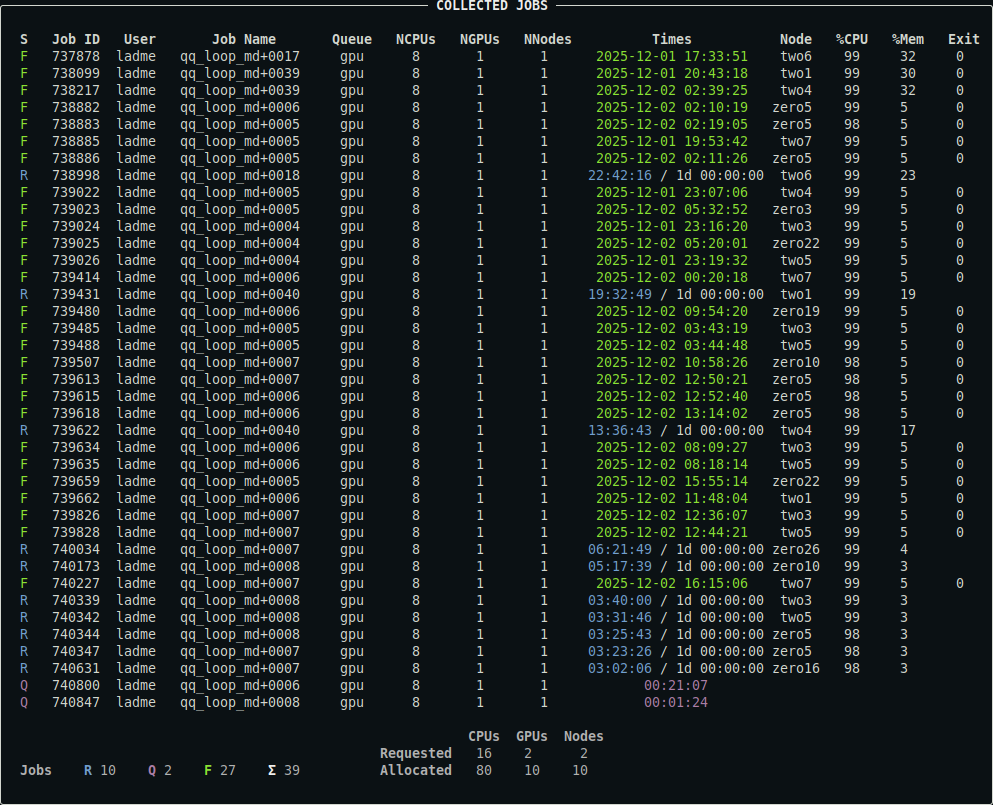
qq jobs
The qq jobs command is used to display information about a user's jobs. It is qq's equivalent of Infinity's pjobs.
Quick comparison with pjobs
- Unlike
pjobs,qq jobsalways shows the nodes that the job is running on, if any are assigned.- Unlike
pjobs,qq jobsdistinguishes between failed/killed and successfully finished jobs in its output.
Description
Displays a summary of your jobs or the jobs of a specified user. By default, only unfinished jobs are shown.
qq jobs [OPTIONS]
Options
-u, --user TEXT — Username whose jobs should be displayed. Defaults to your own username.
-e, --extra — Include extra information about the jobs.
-a, --all — Include both unfinished and finished jobs in the summary.
--yaml — Output job metadata in YAML format.
Examples
qq jobs
Displays a summary of your unfinished jobs (queued, running, or exiting). This includes both qq jobs and any other jobs associated with the current batch server.
This is what the output might look like:
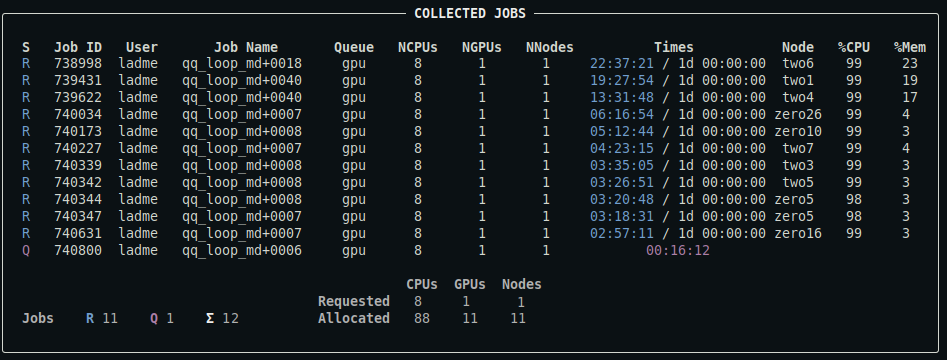
For a detailed description of the output, see below.
qq jobs -u user2
Displays a summary of user2's unfinished jobs.
qq jobs -e
Includes extra information about your jobs in the output: the input machine (if available), the input directory, and the job comment (if available).
qq jobs --all
Displays a summary of all your jobs in the batch system, both unfinished and finished. Note that the batch system eventually removes records of finished jobs, so they may disappear from the output over time. This is what the output might look like:
For a detailed description of the output, see below.
qq jobs --yaml
Prints a summary of your unfinished jobs in YAML format. This output contains all available metadata as provided by the batch system.
Notes
- This command lists all types of jobs, including those submitted using
qq submitand jobs created through other tools. - The run times and job states may not exactly match the output of
qq info, sinceqq jobsrelies solely on batch system data and does not use qq info files.
Description of the output
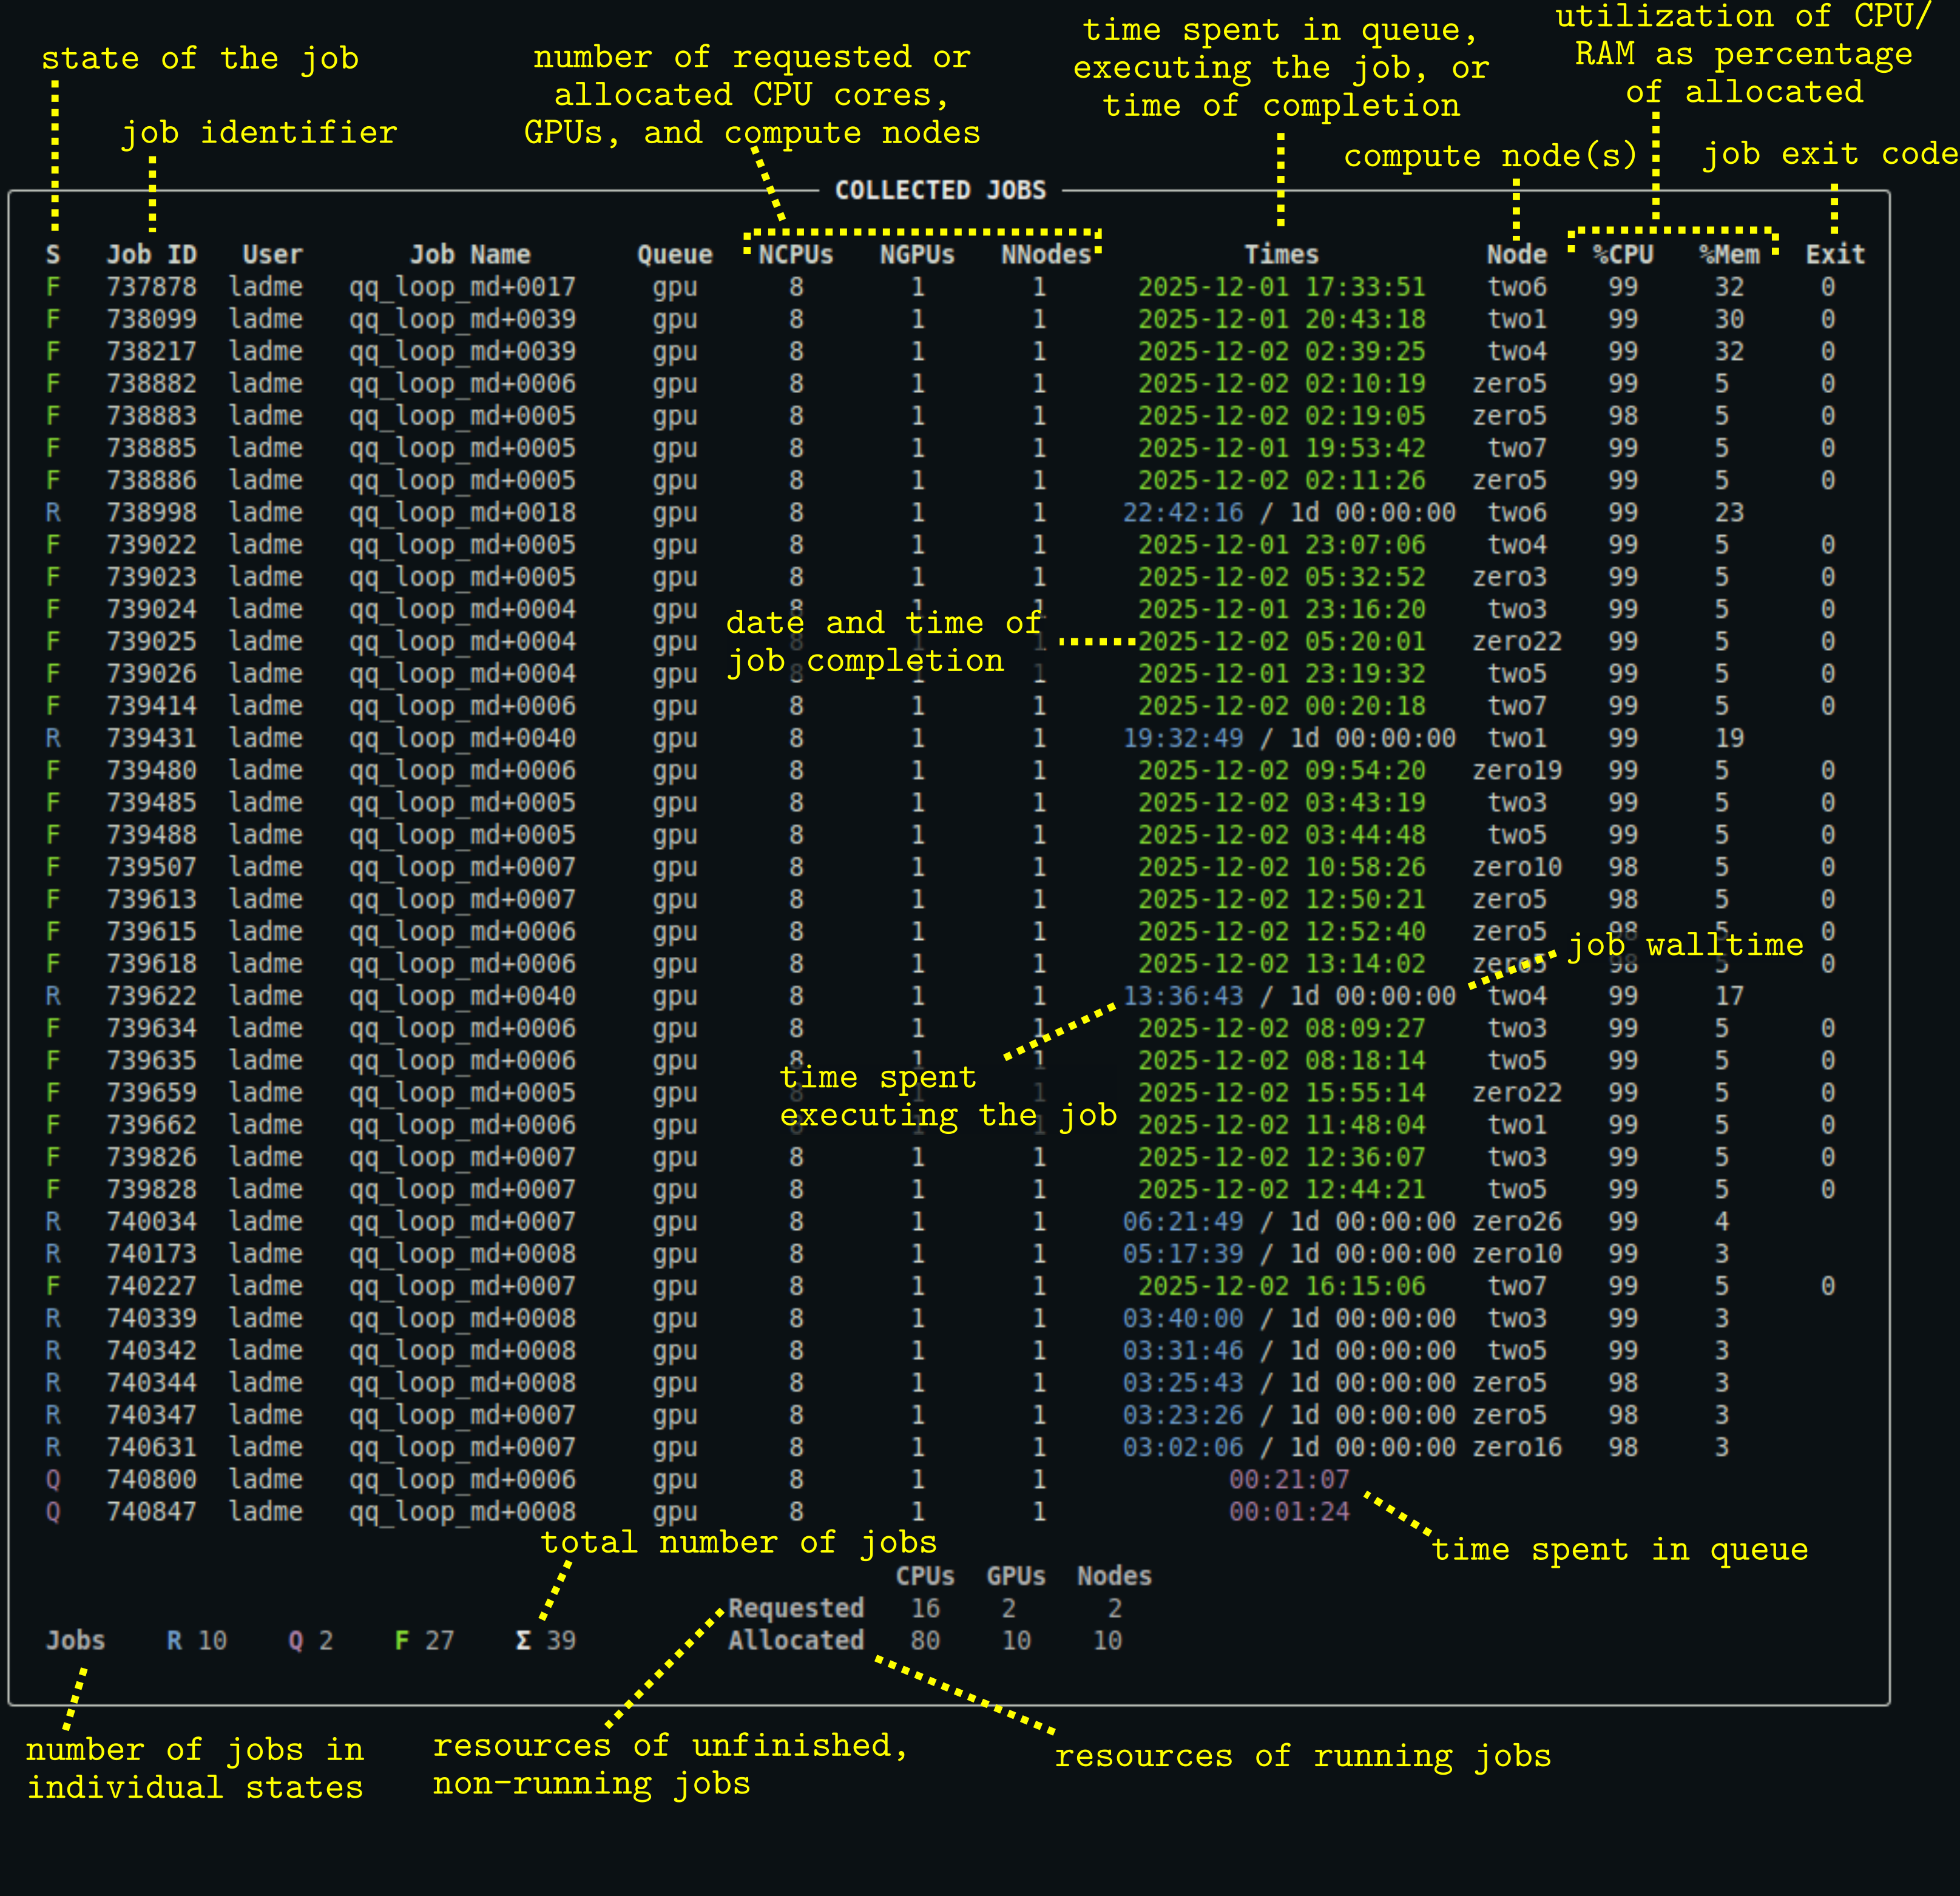
- The output of
qq statis the same, except that it displays the jobs of all users. - You can control which columns are displayed and customize the appearance of the output using a configuration file.
- Note that the
%CPUand%Memcolumns are not available on systems using Slurm (Karolina, LUMI).
qq kill
The qq kill command is used to terminate qq jobs. It is qq's equivalent of Infinity's pkill.
Quick comparison with pkill
- You can use
qq killwith a job ID to terminate a job without having to navigate to its input directory.- When prompted to confirm that you want to terminate a job,
qq killonly requires pressing a single key (yto confirm or any other key to cancel), instead of typing 'yes' and pressing Enter.qq kill --forcewill attempt to terminate jobs even if qq considers them finished, failed, or already killed. This is useful for removing stuck or lingering jobs from the batch system.
Description
Terminates the specified qq job, or all qq jobs submitted from the current directory.
qq kill [OPTIONS] JOB_ID
JOB_ID — Identifier of the job to terminate. This argument is optional.
If JOB_ID is not provided, qq kill searches for qq jobs in the current directory. If multiple suitable jobs are found, qq kill terminates each one in turn.
By default, qq kill prompts for confirmation before terminating a job.
Without the --force flag, it will only attempt to terminate jobs that are queued, held, booting, or running — not jobs that are already finished or killed. When the --force flag is used, qq kill attempts to terminate any job regardless of its state, including jobs that qq believes are already finished or killed. This can be used to remove lingering or stuck jobs.
Options
-y, --yes — Terminate the job without asking for confirmation.
--force — Forcefully terminate the job, ignoring its current state and skipping confirmation.
Examples
qq kill 123456
Terminates the job with ID 123456. You can use either the short job ID or the full ID including the batch server address. You will be prompted to confirm the termination by pressing y. This command only works if the specified job is a qq job with a valid and accessible info file, and the batch server must be reachable from the current machine.
qq kill
Terminates all suitable qq jobs whose info files are present in the current directory. You will be asked to confirm each termination individually.
qq kill 123456 -y
Terminates the job with ID 123456 without asking for confirmation (assumes 'yes').
qq kill 123456 --force
Forcefully terminates the job with ID 123456. This kills the job immediately and without confirmation, regardless of qq's recorded job state.
qq killall
The qq killall command is used to terminate all of your qq jobs. It is qq's equivalent of Infinity's pkillall.
Quick comparison with pkillall
qq killallcan only terminate jobs submitted usingqq submit; other jobs are not affected.
Description
Terminates all qq jobs submitted by the current user.
qq killall [OPTIONS]
This command only terminates qq jobs — other jobs in the batch system are not affected.
By default, qq killall prompts for confirmation before terminating the jobs.
Options
-y, --yes — Terminate all jobs without confirmation.
--force — Forcefully terminate all jobs, ignoring their current states and skipping confirmation.
Examples
qq killall
Terminates all your qq jobs with valid and accessible info files. You will be prompted to confirm termination by pressing y.
qq killall -y
Terminates all your qq jobs with valid and accessible info files without asking for confirmation (assumes "yes").
qq killall --force
Forcefully terminates all your qq jobs with valid and accessible info files. No confirmation is requested, and the jobs will be terminated even if qq believes they are already finished, failed, or killed.
qq nodes
The qq nodes command displays the compute nodes available on the current batch server. It is qq's equivalent of Infinity's pnodes.
Quick comparison with pnodes
- The output of
qq nodesis more dynamically formatted than that ofpnodes. If an entire group of nodes lacks a specific attribute (e.g., no GPUs, no shared scratch storage), the corresponding column is hidden.- Node group assignments are always determined heuristically based on node names. A full match of the alphabetic part of the name is required for nodes to belong to the same group (unlike
pnodes, which uses partial matches).
Description
Displays information about the nodes managed by the batch system. By default, only nodes that are available to you are shown.
qq nodes [OPTIONS]
Nodes are grouped heuristically into node groups based on their names.
Options
-a, --all — Display all nodes, including those that are down, inaccessible, or reserved.
--yaml — Output node metadata in YAML format.
Examples
qq nodes
Displays a summary of all nodes in the batch system that are available to you.
This is what the output might look like (truncated):
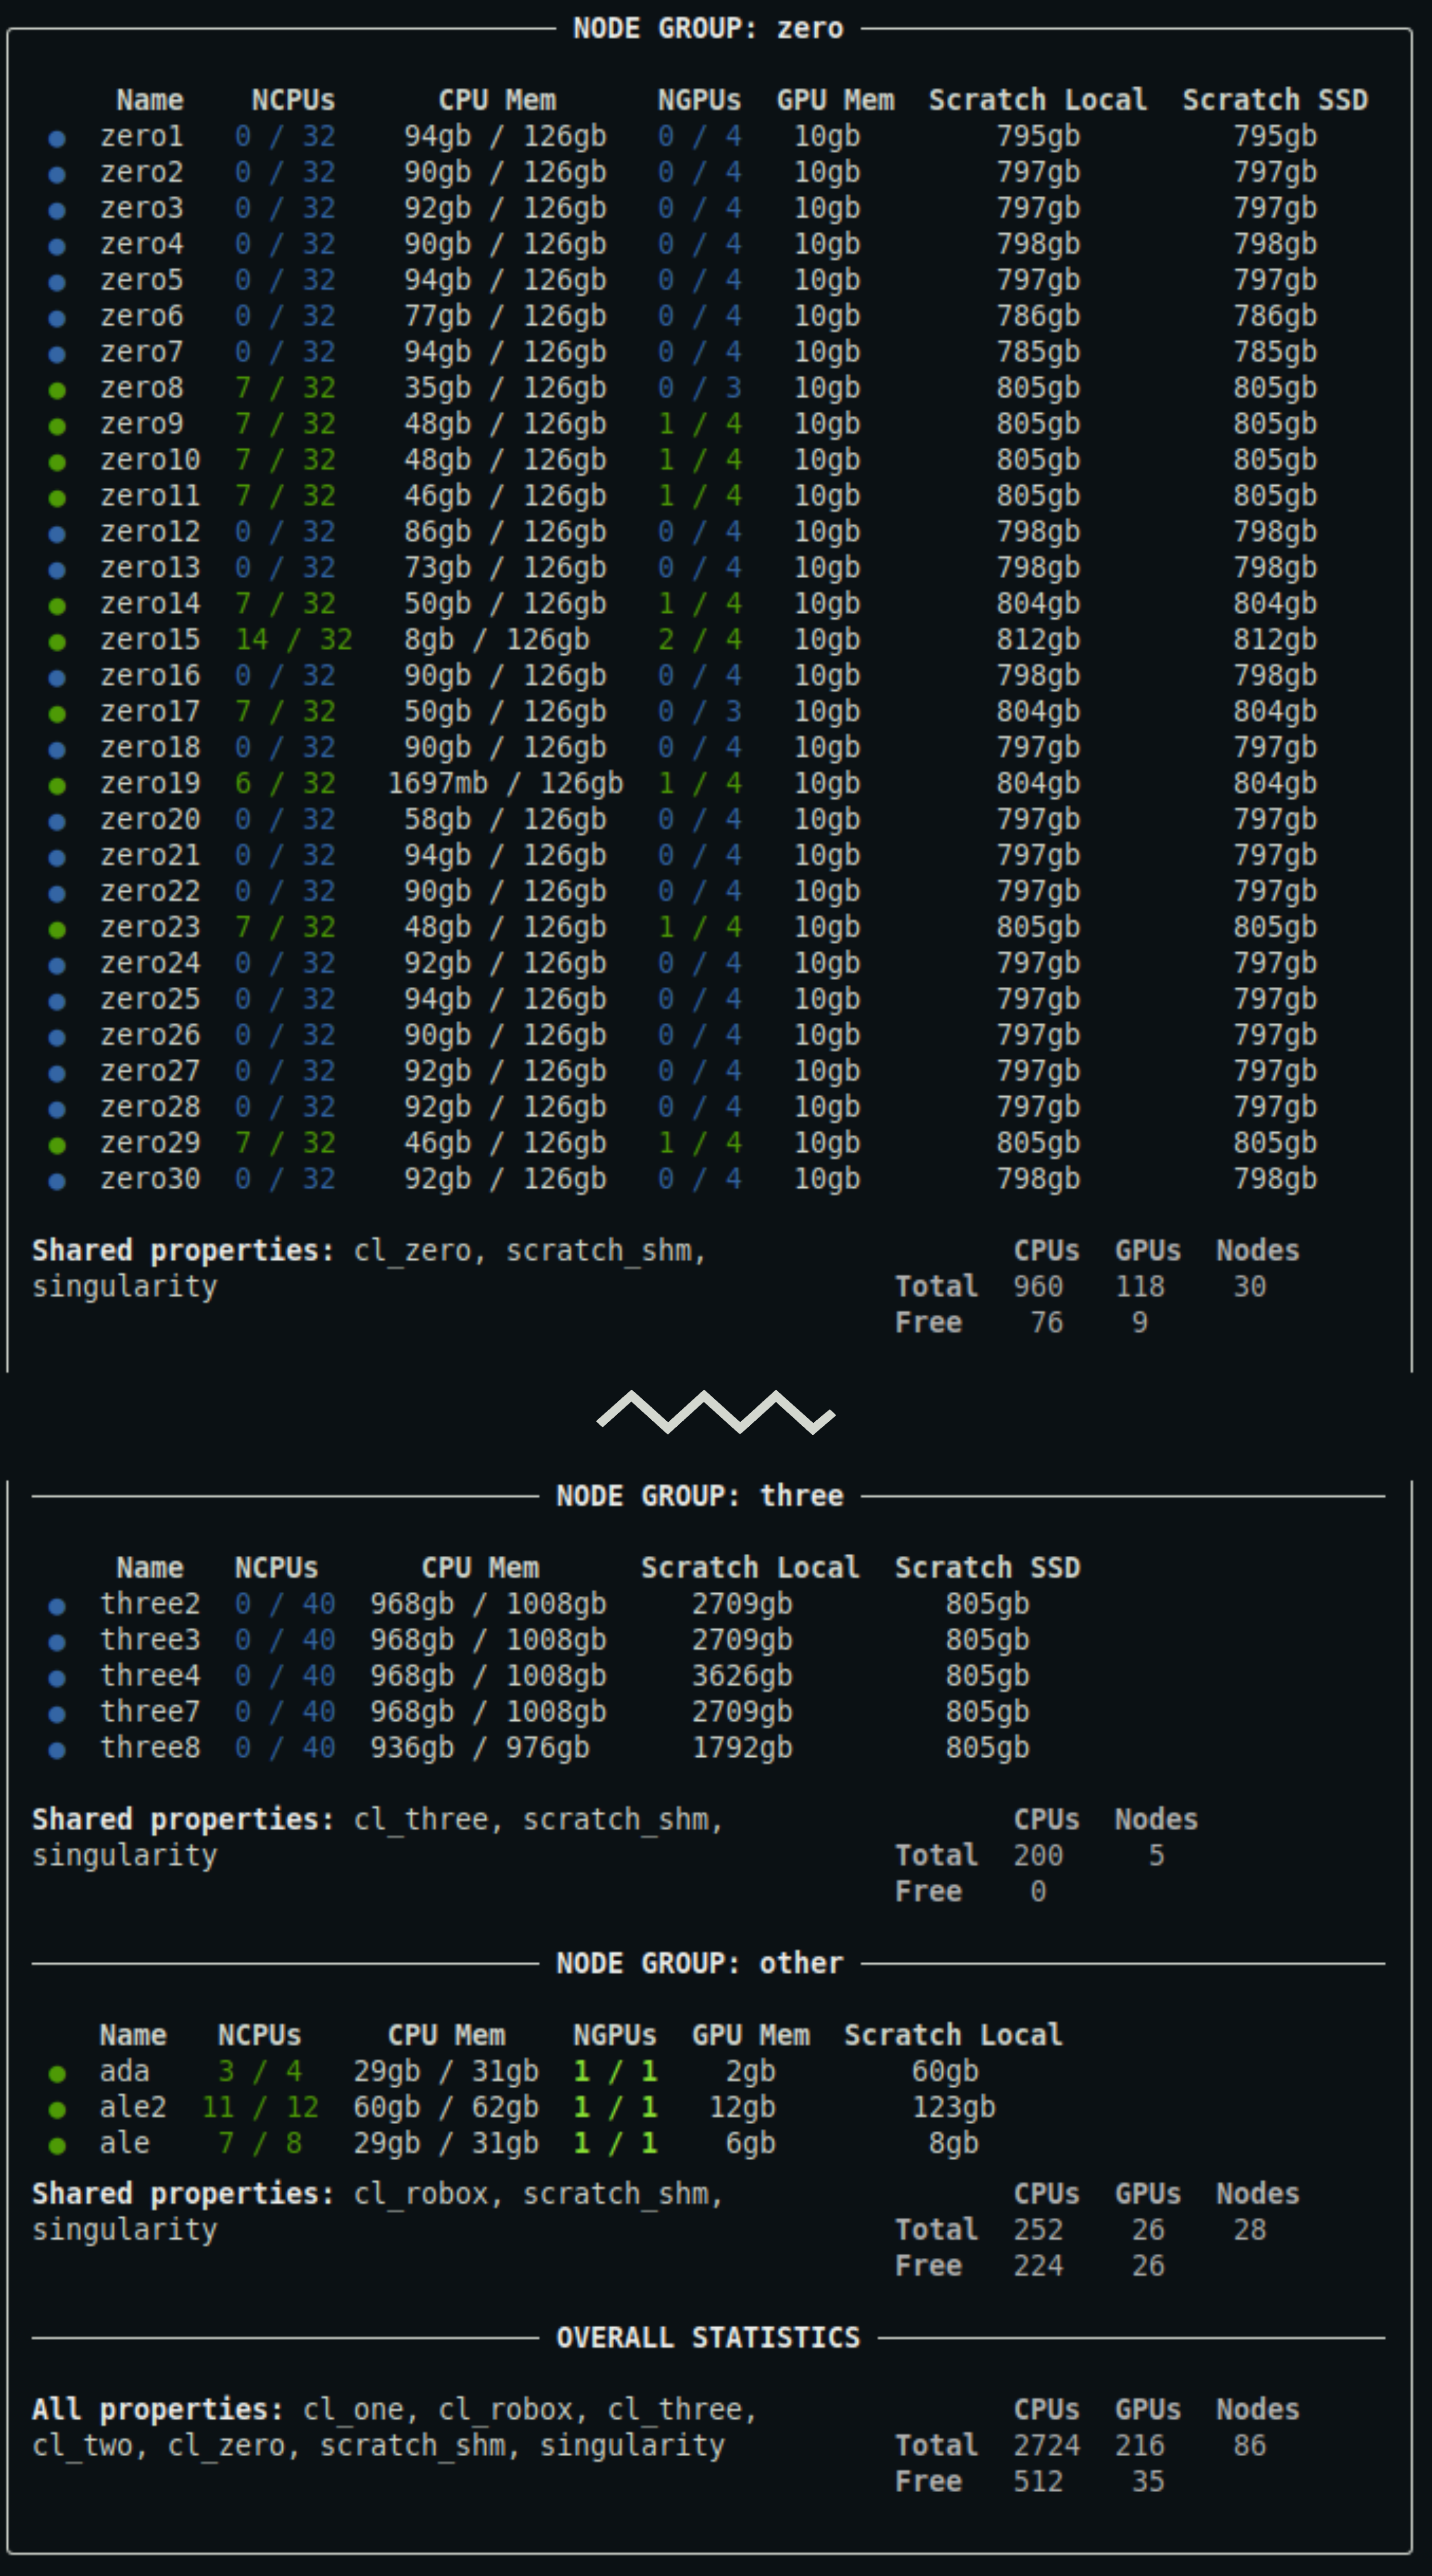
Output truncated. For a detailed description of the output, see below.
qq nodes --all
Displays a summary of all nodes in the batch system, including those that are down, inaccessible, or reserved.
qq nodes --yaml
Prints a summary of all available nodes in YAML format. This output contains the full metadata provided by the batch system.
Notes
- The availability state of nodes is not always perfectly reliable. Occasionally, nodes that are actually unavailable may still be reported as available.
Description of the output
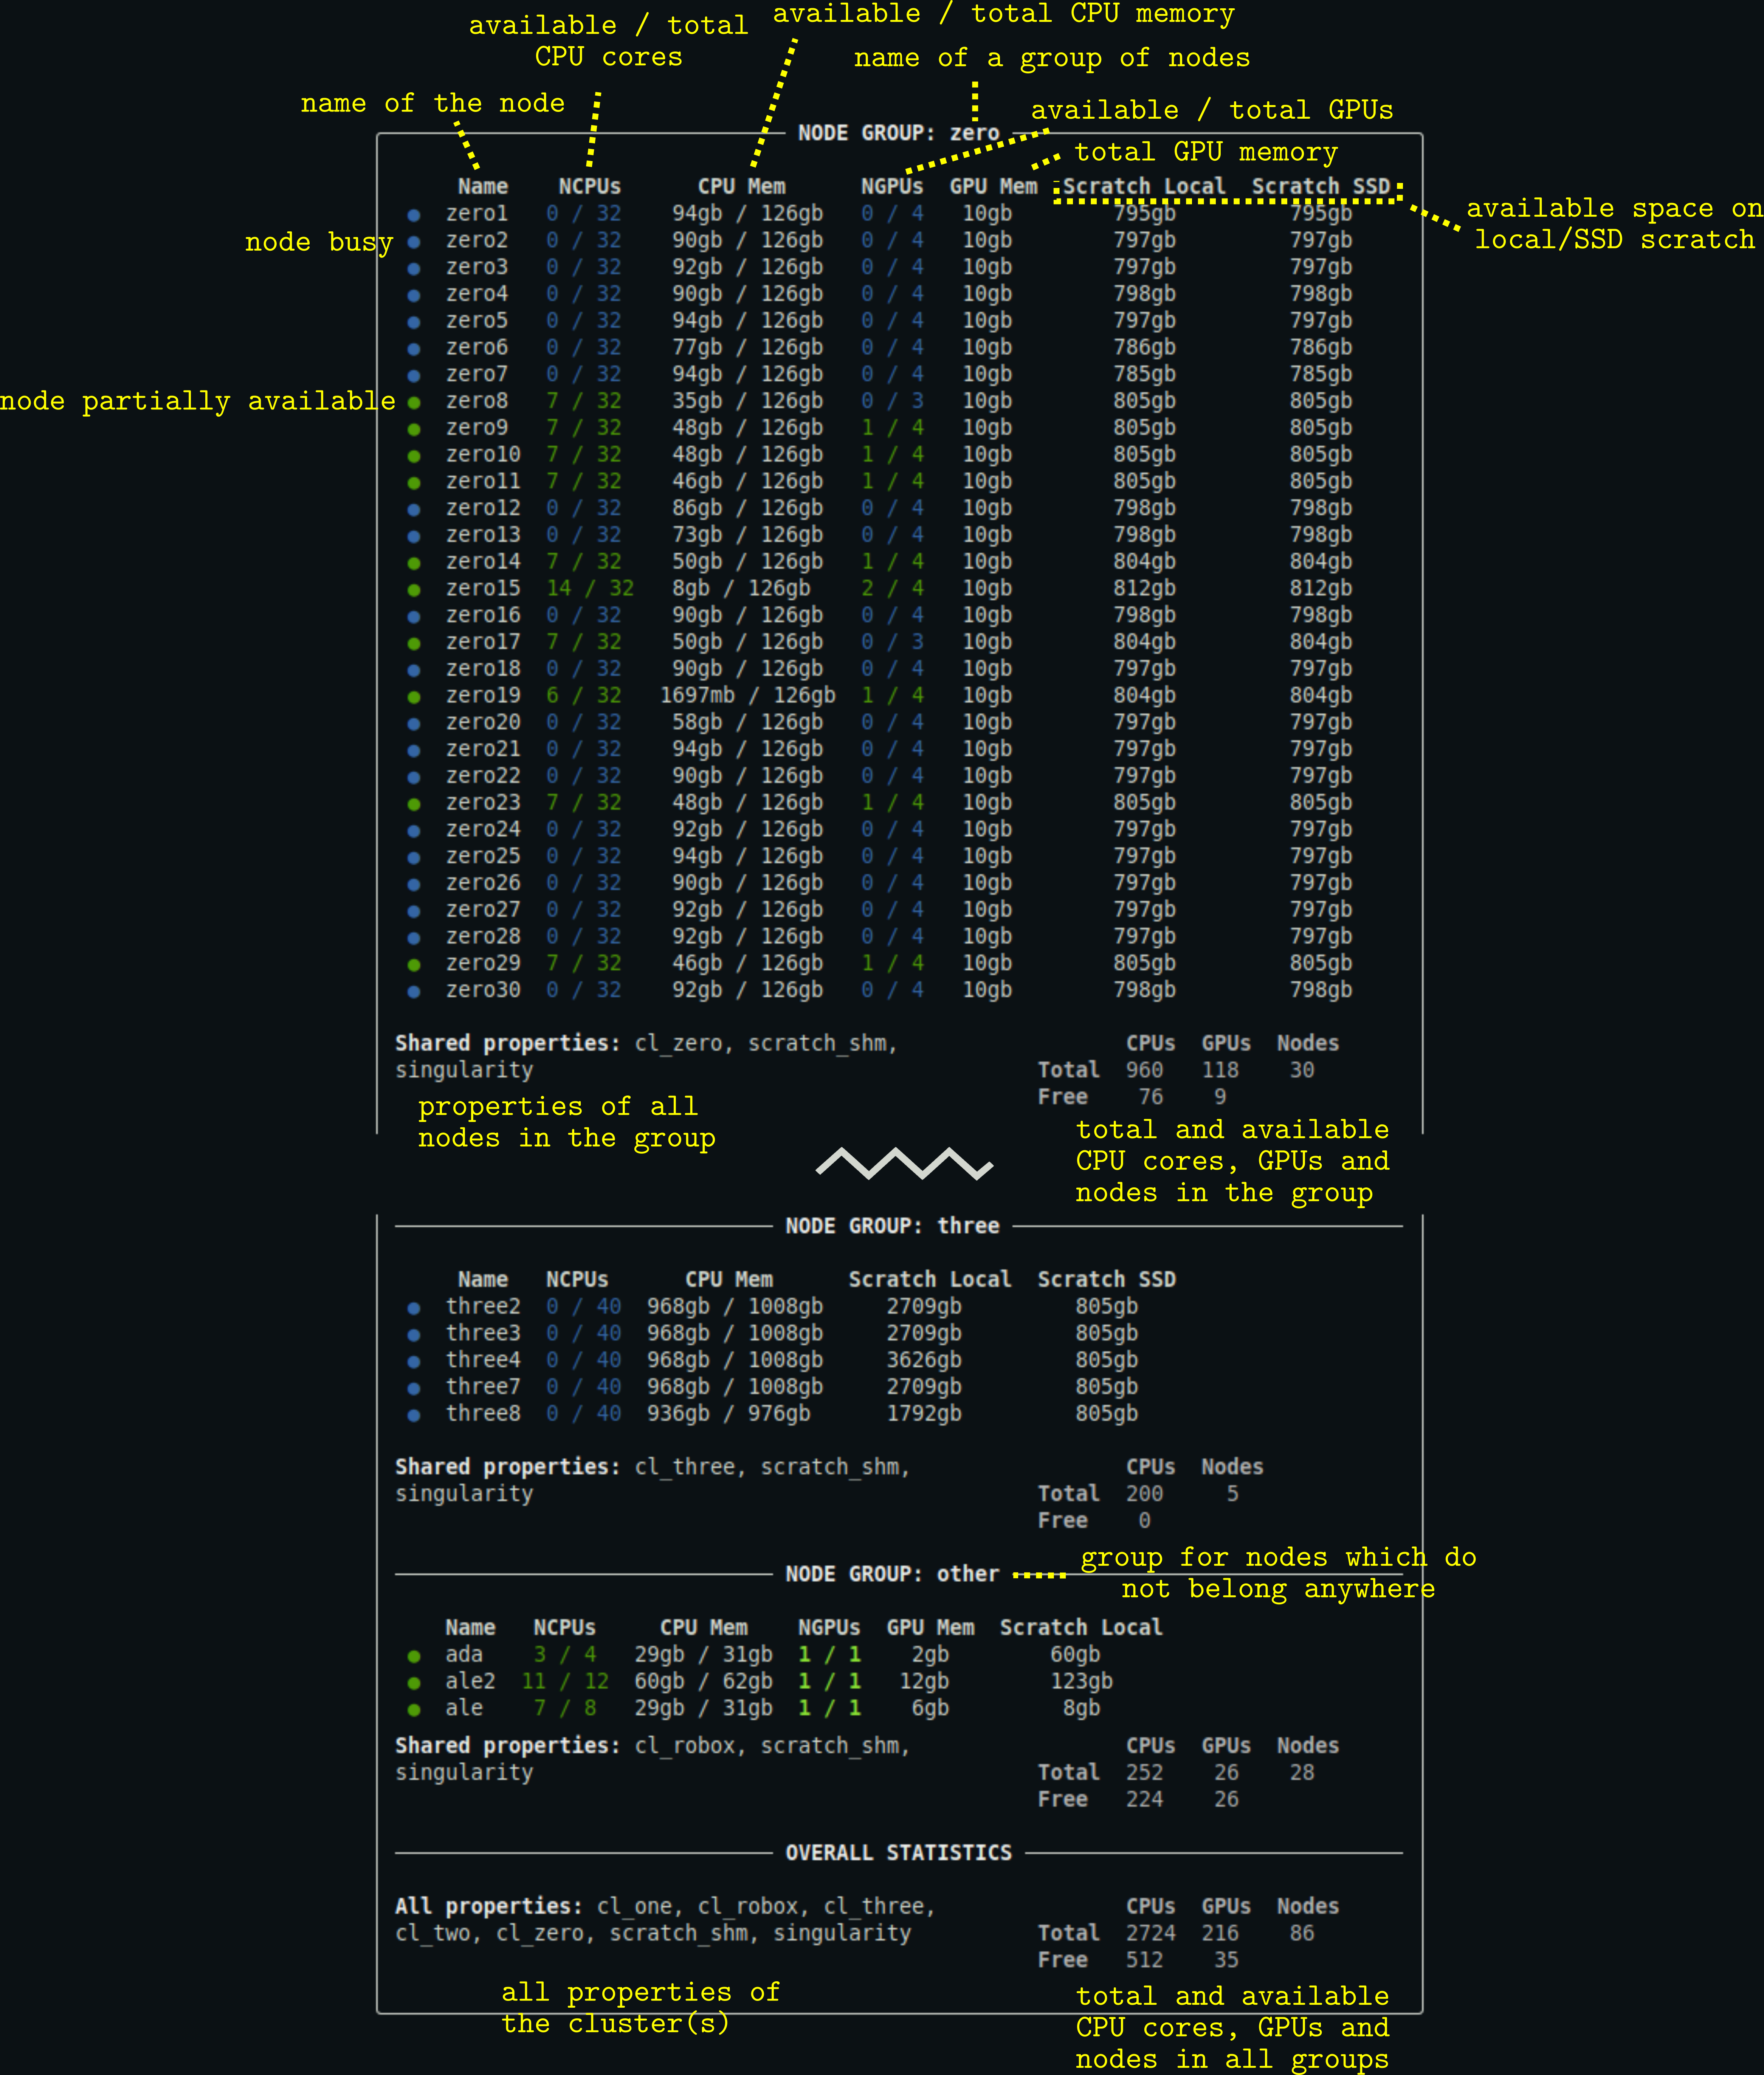
- You can customize the appearance of the output using a configuration file.
- Columns for resources that are not relevant to a given node group (e.g., when no node in the group has GPUs) are hidden.
- For some node groups, there may also be a
Scratch Sharedcolumn specifying the amount of scratch space available to be shared among the nodes.
qq queues
The qq queues command displays the queues available on the current batch server. It is qq's equivalent of Infinity's pqueues.
Quick comparison with pqueues
qq queuesis generally more accurate at identifying available and unavailable queues thanpqueues.- The only other notable difference is the output format.
Description
Displays information about the queues available on the current batch server. By default, only queues that are available to you are shown.
qq queues [OPTIONS]
Options
-a, --all — Display all queues, including those that are not available to you.
--yaml — Output queue metadata in YAML format.
Examples
qq queues
Displays a summary of all batch system queues to which you can submit jobs.
This is what the output might look like:
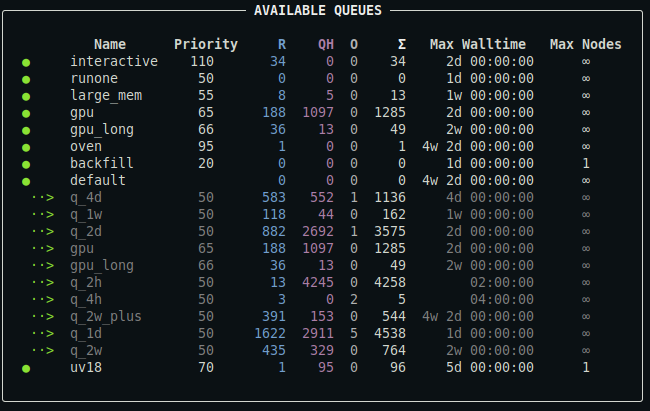
For a detailed description of the output, see below.
qq queues --all
Displays a summary of all queues in the batch system, including those you cannot submit to.
This is what the output might look like:
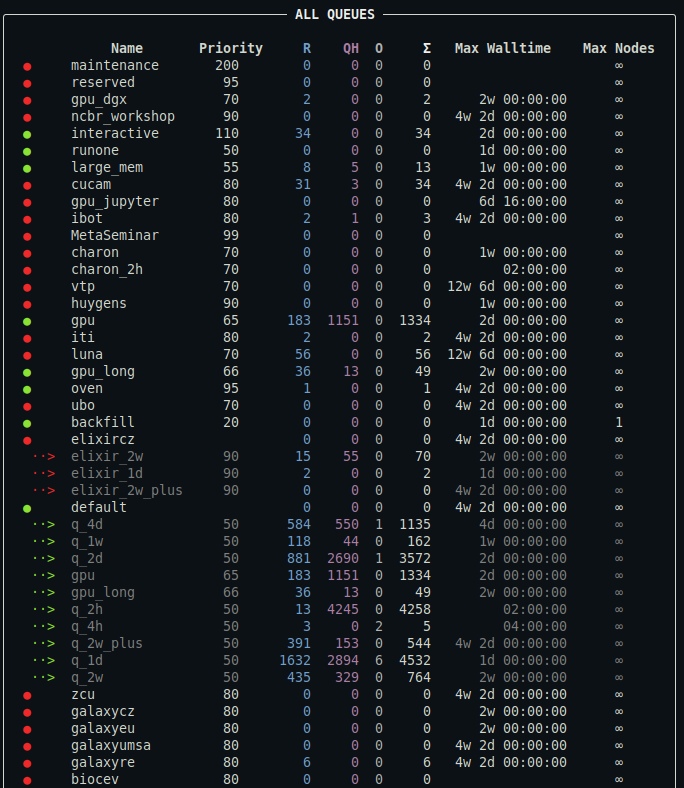
Output truncated. For a detailed description of the output, see below.
qq queues --yaml
Prints a summary of all available queues in YAML format. This output contains the full metadata provided by the batch system.
Description of the output
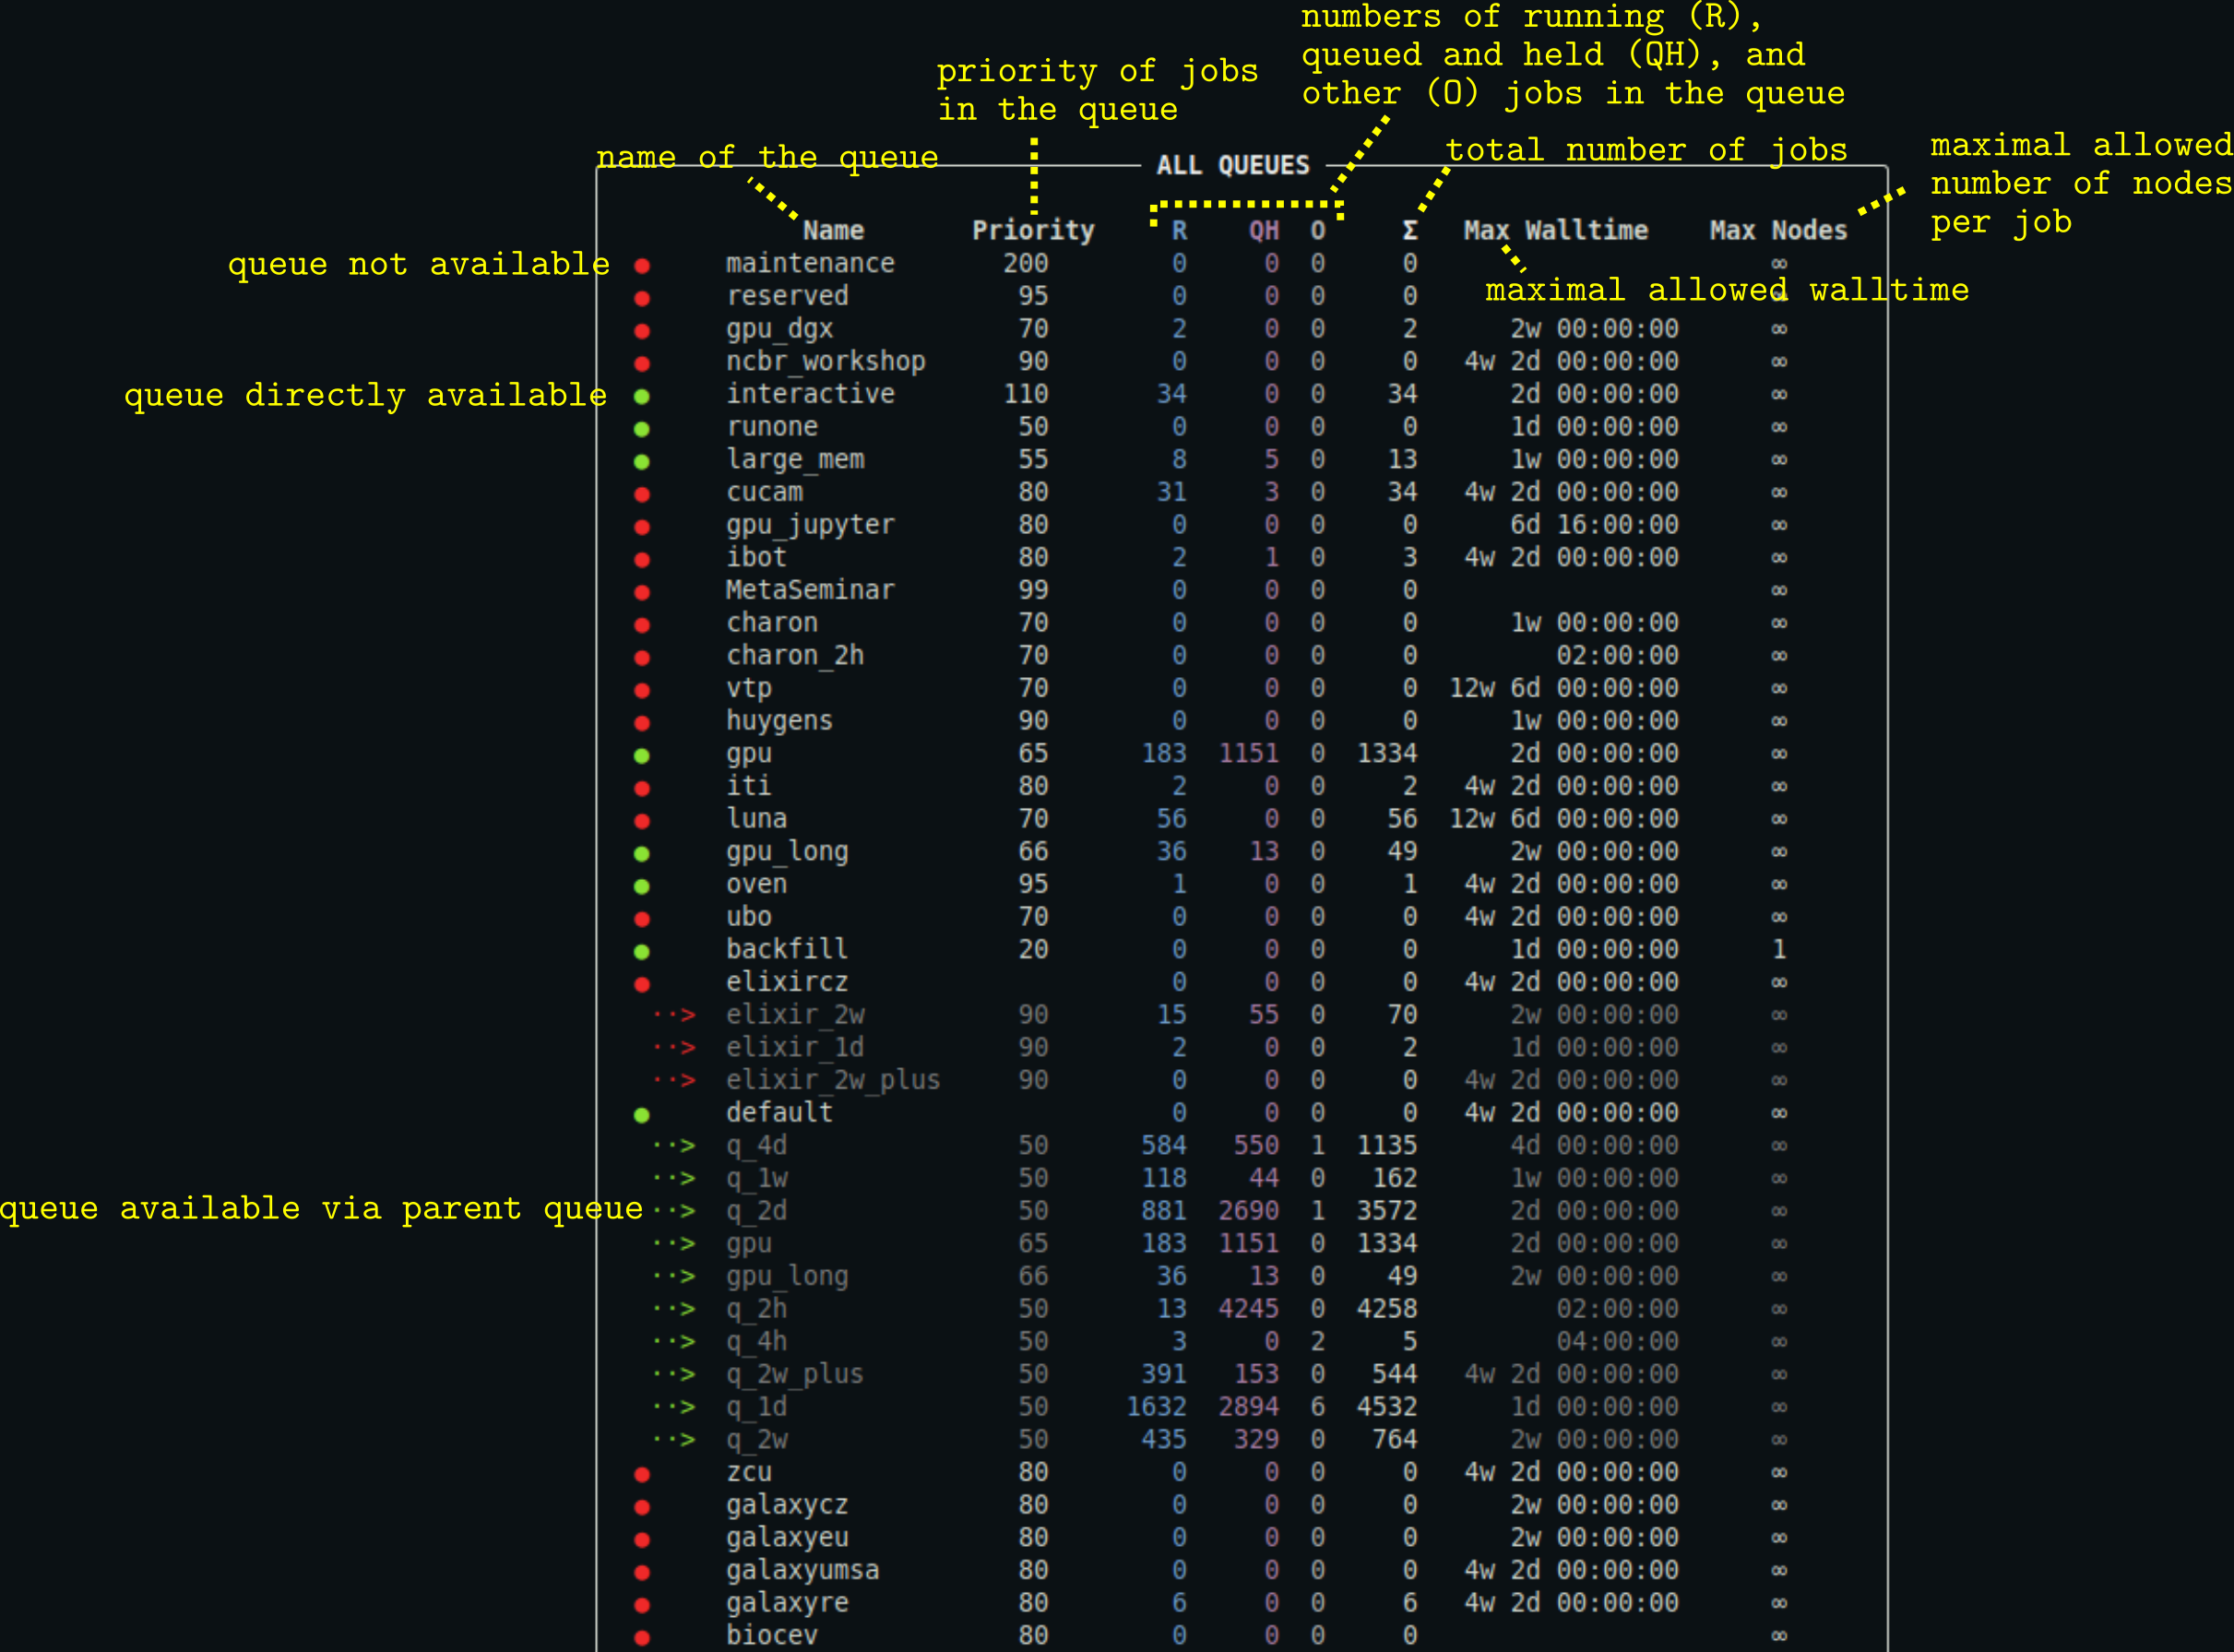
- You can customize the appearance of the output using a configuration file.
- The output may also contain the column
Commentproviding the comment associated with the queue (typically additional information about the queue). Max Nodescolumn is hidden if no queue defines a maximal allowed number of requested nodes per job.
qq shebang
The qq shebang command is a utility for converting regular scripts into qq-compatible scripts. It has no direct equivalent in Infinity.
Description
Adds the qq run shebang to a script, or replaces an existing one. If no script is specified, it simply prints the qq run shebang to standard output.
qq shebang [OPTIONS] SCRIPT
SCRIPT — Path to the script to modify. This argument is optional.
Examples
Suppose we have a script named run_script.sh with the following content:
#!/bin/bash

# activate the Gromacs module
metamodule add gromacs/2024.3-cuda

# prepare a TPR file
gmx_mpi grompp -f md.mdp -c eq.gro -t eq.cpt -n index.ndx -p system.top -o md.tpr

# run the simulation using 8 OpenMP threads
gmx_mpi mdrun -deffnm md -ntomp 8 -v
This script cannot be submitted using qq submit because it lacks the qq run shebang.
By running:
qq shebang run_script.sh
the existing bash shebang is replaced with the qq run shebang, resulting in:
#!/usr/bin/env -S qq run

# activate the Gromacs module
metamodule add gromacs/2024.3-cuda

# prepare a TPR file
gmx_mpi grompp -f md.mdp -c eq.gro -t eq.cpt -n index.ndx -p system.top -o md.tpr

# run the simulation using 8 OpenMP threads
gmx_mpi mdrun -deffnm md -ntomp 8 -v
If you run qq shebang without specifying a script (you use just qq shebang), it simply prints the qq shebang to standard output:
#!/usr/bin/env -S qq run
qq run
The qq run command represents the execution environment in which a qq job runs. It is qq's equivalent of Infinity's infex script and the infinity-env.
You should not invoke qq run directly. Instead, every script submitted with qq submit must include the following shebang line:
#!/usr/bin/env -S qq run
For more details about what qq run does, see the sections on standard jobs and loop jobs.
Quick comparison with infex and infinity-env
- Like
infinity-env, using theqq runshebang prevents you from accidentally running the script directly.- Unlike Infinity, all qq jobs must use this execution environment — no separate helper run script is created when submitting a qq job.
qq runalso takes over the responsibilities ofparchiveandpresubmit, which have no direct equivalents in qq.
qq stat
The qq stat command displays information about jobs from all users. It is qq's equivalent of Infinity's pqstat.
Quick comparison with pqstat
- The same differences that apply between
qq jobsandpjobsalso apply here.
Description
Displays a summary of jobs from all users. By default, only unfinished jobs are shown.
qq stat [OPTIONS]
Options
-e, --extra — Include extra information about the jobs.
-a, --all — Include both unfinished and finished jobs in the summary.
--yaml — Output job metadata in YAML format.
Examples
qq stat
Displays a summary of all unfinished (queued, running, or exiting) jobs associated with the current batch server. The display looks similar to the display of qq jobs.
qq stat -e
Includes extra information about the jobs in the output: the input machine (if available), the input directory, and the job comment (if available).
qq stat --all
Displays a summary of all jobs in the batch system, both unfinished and finished. Note that the batch system eventually removes information about finished jobs, so they may disappear from the output over time.
qq stat --yaml
Prints a summary of all unfinished jobs in YAML format. This output contains all metadata provided by the batch system.
Notes
- This command lists all types of jobs, including those submitted using
qq submitand jobs created through other tools. - The run times and job states may not exactly match the output of
qq info, sinceqq statrelies solely on batch system data and does not use qq info files.
qq submit
The qq submit command is used to submit qq jobs to the batch system. It is qq's equivalent of Infinity's psubmit.
Quick comparison with psubmit
qq submitdoes not ask for confirmation; it behaves likepsubmit (...) -y.Options and parameters are specified differently. The only positional argument is the script name — everything else is an option. You can see all supported options using
qq submit --help.Infinity:
psubmit cpu run_script ncpus=8,walltime=12h,props=cl_zero -yqq:
qq submit -q cpu run_script --ncpus=8 --walltime=12h --props=cl_zeroOptions can also be specified directly in the submitted script, or as a mix of in-script and command-line definitions. Command-line options always take precedence.
Unlike with
psubmit, you do not have to executeqq submitdirectly from the directory with the submitted script. You can runqq submitfrom anywhere and provide the path to your script. The job's input directory will always be the submitted script's parent directory.
qq submithas better support for multi-node jobs thanpsubmitas it allows specifying resource requirements per requested node.
Description
Submits a qq job to the batch system.
qq submit [OPTIONS] SCRIPT
SCRIPT — Path to the script to submit.
The submitted script must contain the qq run shebang. You can add it to your script by running qq shebang SCRIPT.
When the job is successfully submitted, qq submit creates a .qqinfo file for tracking the job’s state.
Options
General settings
-q, --queue TEXT — Name of the queue to submit the job to.
--account TEXT — Account to use for the job. Required only in environments with accounting (e.g., IT4Innovations).
--job-type TEXT — Type of the qq job. Defaults to standard.
--exclude TEXT — A colon-, comma-, or space-separated list of files or directories that should not be copied to the working directory. Paths must be relative to the input directory.
--include TEXT — A colon-, comma-, or space-separated list of files or directories that should be copied to the working directory even though they are not part of the input directory. These files will not be copied back after the job finishes Paths may be absolute or relative to the input directory. Ignored if the input directory is used directly as the working directory.
--depend TEXT — Job dependency specification. You may provide one or more dependency expressions separated by commas or spaces. Each expression uses the format <type>=<job_id>[:<job_id>...], e.g.: after=1234, afterok=456:789.
--batch-system TEXT — Name of the batch system to submit the job to. If not provided, qq will use the environment variable QQ_BATCH_SYSTEM or attempt to auto-detect the system.
Requested resources
--nnodes INTEGER — Number of compute nodes to allocate for the job.
--ncpus-per-node INTEGER — Number of CPU cores to allocate per requested node.
--ncpus INTEGER — Total number of CPU cores to allocate for the job. Overrides --ncpus-per-node.
--mem-per-cpu TEXT — Memory per CPU core. Specify as Nmb or Ngb (e.g., 500mb, 2gb).
--mem-per-node TEXT — Memory per node. Specify as Nmb or Ngb (e.g., 500mb, 32gb). Overrides --mem-per-cpu.
--mem TEXT — Total memory for the job. Specify as Nmb or Ngb (e.g., 500mb, 64gb). Overrides both --mem-per-cpu and --mem-per-node.
--ngpus-per-node INTEGER — Number of GPUs to allocate per requested node.
--ngpus INTEGER — Total number of GPUs to allocate for the job. Overrides --ngpus-per-node.
--walltime TEXT — Maximum allowed runtime for the job. Examples: 1d, 12h, 10m, 24:00:00, 12:00:00, 00:10:00.
--work-dir, --workdir TEXT — Working directory type for the job. Available types depend on the environment.
--work-size-per-cpu, --worksize-per-cpu TEXT — Storage per CPU core. Specify as Ngb (e.g., 1gb).
--work-size-per-node, --worksize-per-node TEXT — Storage per node. Specify as Ngb (e.g., 32gb). Overrides --work-size-per-cpu.
--work-size, --worksize TEXT — Total storage for the job. Specify as Ngb (e.g., 64gb). Overrides both --work-size-per-cpu and --work-size-per-node.
--props TEXT — Colon-, comma-, or space-separated list of required or prohibited node properties (e.g., cl_two or ^cl_two).
Loop options
(Only used when --job-type is set to loop.)
--loop-start INTEGER — Starting cycle number. Defaults to 1.
--loop-end INTEGER — Ending cycle number.
--archive TEXT — Directory used for archiving loop-job files. Defaults to storage.
--archive-format TEXT — Filename format for archived files. Defaults to job%04d.
Specifying options in the script
Instead of specifying submission options on the command line, you can include them directly in the script using qq directives.
qq directives follow this format: # qq <option>=<value> or # qq <option> <value> (both are equivalent).
The word qq is case-insensitive (qq, QQ, Qq, and qQ are all valid), and spacing is flexible.
All qq directives must appear at the beginning of the script, before any executable commands.
Example:
#!/usr/bin/env -S qq run

# qq job-type loop
# qq loop-end 10
# qq archive storage
# qq archive-format md%04d

# qq ncpus=8
# qq ngpus=1
# qq walltime=1d

metamodule add ...
In the example above, kebab-case is used for option names, but qq directives also support snake_case, camelCase, and PascalCase.
For example:# qq job-type loop,# qq job_type loop,# qq jobType loop, and# qq JobType loopare all equivalent.
Command-line options always take precedence over options defined in the script body.
Examples
qq submit run_script.sh -q default --ncpus=8 --workdir=scratch_local --worksize-per-cpu=2gb --walltime=2d --props=hyperthreading
Submits the script run_script.sh to the default queue, requesting 8 CPU cores and 16 GB of local scratch space (2 GB per core). The requested walltime is 48 hours, and the job must run on a node with the hyperthreading property. Additional options may come from the script or queue defaults, but command-line options take precedence.
qq submit run_script.sh
Submits the script run_script.sh, taking all submission options from the script itself or from queue/server defaults.
qq sync
The qq sync command fetches files from a job's working directory to its input directory. It is qq's equivalent of Infinity's psync.
Quick comparison with psync
- Unlike
psync,qq syncfetches all files from the working directory by default.- You can use
qq syncwith a job ID to fetch files from the job's working directory to its input directory without having to actually navigate to its input directory.- If you want to fetch only specific files, you cannot select them interactively — you must provide a list of filenames when running
qq sync.
Description
Fetches files from the working directory of the specified qq job, or from the working directory of the job submitted from the current directory.
qq sync [OPTIONS] JOB_ID
JOB_ID — Identifier of the job whose working directory files should be fetched. This argument is optional.
If JOB_ID is not provided, qq sync searches for qq jobs in the current directory. If multiple suitable jobs are found, qq sync fetches files from each one in turn. Files fetched from later jobs may overwrite files from earlier ones in the input directory.
Files are copied from the job's working directory to its input directory, not to the current directory.
Options
-f, --files TEXT — A colon-, comma-, or space-separated list of files and directories to fetch. If not specified, the entire content of the working directory is fetched.
Examples
qq sync 123456
Fetches all files from the working directory of the job with ID 123456 to that job's input directory. You can use either the short job ID or the full ID including the batch server address. This only works if the specified job is a qq job with a valid and accessible info file, and if the batch server and main node are reachable from the current machine.
qq sync
Fetches all files from the working directories of all jobs whose info files are present in the current directory.
qq sync 123456 -f file1.txt,file2.txt,file3.txt
Fetches file1.txt, file2.txt, and file3.txt from the working directory of the job with ID 123456 to its input directory. All other files are ignored. Missing files are skipped without error.
qq wipe
The qq wipe command is used to delete working directories of qq jobs. It has no direct equivalent in Infinity.
It can be tricky to remember the difference between
qq wipeandqq clear. This might be useful: Wipe affects the Working directory.
Description
Deletes the working directory of the specified qq job, or of all qq jobs in the current directory.
qq wipe [OPTIONS] JOB_ID
JOB_ID — Identifier of the job which working directory should be deleted. This argument is optional.
If JOB_ID is not specified, qq wipe searches for qq jobs in the current directory.
By default, qq wipe prompts for confirmation before deleting the working directory.
Without the --force flag, it will only attempt to delete working directories of jobs that have failed or been killed. When the --force flag is used, qq wipe attempts to wipe the working directory of any job regardless of its state, including jobs that are queued, running or successfully finished. You should be very careful when using this option as it may delete useful data or cause your job to crash!
If the working directory matches the input directory,
qq wipewill never delete it, even if you use the--forceflag, to protect you from accidentally removing your data.
Options
-y, --yes — Delete the working directory without confirmation.
--force — Delete the working directory of the job forcibly, ignoring its current state and without confirmation.
Examples
qq wipe 123456
Deletes the working directory of the job with ID 123456. You can use either the short job ID or the full ID including the batch server address. You will be prompted to confirm the termination by pressing y. This command only works if the specified job is a qq job with a valid and accessible info file, and the batch server must be reachable from the current machine.
qq wipe
Deletes the working directories of all suitable qq jobs whose info files are present in the current directory. You will be asked to confirm each deletion individually.
qq wipe 123456 -y
Deletes the working directory of the job with ID 123456 without asking for confirmation (assumes 'yes').
qq wipe 123456 --force
Forcefully deletes the working directory of the job with ID 123456. This deletes the working directory no matter the state of the job. This is dangerous — only use the --force flag if you are absolutely sure you know what you are doing!
Configuration
qq is highly configurable. All user-adjustable options (colors, panel widths, timeouts, suffixes, environment variables, and batch-system behavior) are controlled through a single TOML configuration file.
qq automatically loads configuration from:
$QQ_CONFIGenvironment variable (highest priority)qq_config.toml(in the current directory)${HOME}/.config/qq/config.toml(default location, XDG-compatible)
If no file is found, qq falls back to built-in defaults.
If you want the configuration to apply across the entire cluster, you must install it both on your desktop and in the home directories of all compute nodes. However, if you are only customizing qq's appearance (see Themes), placing the configuration file on your desktop will probably suffice.
Configuration structure
The configuration file is a TOML document whose top-level tables correspond directly to qq’s internal configuration groups. You do not need to use all fields—omitted fields simply fall back to defaults.
An example of a tiny config file:
[state_colors]
running = "bright_green"
queued = "bright_yellow"
This configuration makes running jobs display in green (instead of the default blue) and queued jobs display in yellow (instead of the default purple). No other behavior is changed.
See all configurable options below.
Themes
Does writing your own configuration seem to complex? qq provides few ready-to-use themes, available from github.com/Ladme/qq/tree/main/themes.
Available themes include:
- light_terminal — By default, qq assumes a dark terminal background. On light backgrounds, the default output may look very ugly. If you use a light terminal background, you should install this qq theme.
- traffic_lights_theme — Adjusts the colors used for job states: running jobs are green (instead of blue), queued jobs are yellow (instead of purple), failed jobs are red (default color), and finished jobs are blue (instead of green).
You may import these themes directly or copy pieces into your own configuration.
All configurable options
The following expanded TOML structure lists all available sections and fields. You can copy this into your config and modify only the pieces you care about.
Note that we generally recommend modifying only qq's appearance (tables with
presenterin name or thestate_colorstable).Changing any of
suffixes,env_vars,date_formats,exit_codes,binary_nameis dangerous and may break qq's functionality.
##############################################
# File suffixes used by qq.
##############################################
[suffixes]
# Suffix for qq info files.
qq_info = ".qqinfo"
# Suffix for qq output files.
qq_out = ".qqout"
# Suffix for captured stdout.
stdout = ".out"
# Suffix for captured stderr.
stderr = ".err"


##############################################
# Environment variable names used by qq.
##############################################
[env_vars]
# Indicates job is running inside the qq environment.
guard = "QQ_ENV_SET"
# Enables qq debug mode.
debug_mode = "QQ_DEBUG"
# Path to the qq info file for the job.
info_file = "QQ_INFO"
# Machine from which the job was submitted.
input_machine = "QQ_INPUT_MACHINE"
# Submission directory path.
input_dir = "QQ_INPUT_DIR"
# Whether submission was from shared storage.
shared_submit = "QQ_SHARED_SUBMIT"
# Name of the batch system used.
batch_system = "QQ_BATCH_SYSTEM"
# Current loop-cycle index.
loop_current = "QQ_LOOP_CURRENT"
# Starting loop-cycle index.
loop_start = "QQ_LOOP_START"
# Final loop-cycle index.
loop_end = "QQ_LOOP_END"
# Non-resubmit flag returned by a job script.
no_resubmit = "QQ_NO_RESUBMIT"
# Archive filename pattern.
archive_format = "QQ_ARCHIVE_FORMAT"
# Scratch directory on Metacentrum clusters.
pbs_scratch_dir = "SCRATCHDIR"
# Slurm account used for the job.
slurm_job_account = "SLURM_JOB_ACCOUNT"
# Storage type for LUMI scratch.
lumi_scratch_type = "LUMI_SCRATCH_TYPE"
# Total CPUs used.
ncpus = "QQ_NCPUS"
# Total GPUs used.
ngpus = "QQ_NGPUS"
# Total nodes used.
nnodes = "QQ_NNODES"
# Walltime in hours.
walltime = "QQ_WALLTIME"


##############################################
# Timeout settings in seconds.
##############################################
[timeouts]
# Timeout for SSH in seconds.
ssh = 60
# Timeout for rsync in seconds.
rsync = 600


##############################################
# Settings for Runner (qq run) operations.
##############################################
[runner]
# Maximum number of attempts when retrying an operation.
retry_tries = 3
# Wait time (in seconds) between retry attempts.
retry_wait = 300
# Delay (in seconds) between sending SIGTERM and SIGKILL to a job script.
sigterm_to_sigkill = 5
# Interval (in seconds) between successive checks of the running script's state.
subprocess_checks_wait_time = 2


##############################################
# Settings for Archiver operations.
##############################################
[archiver]
# Maximum number of attempts when retrying an operation.
retry_tries = 3
# Wait time (in seconds) between retry attempts.
retry_wait = 300


##############################################
# Settings for Goer (qq go) operations.
##############################################
[goer]
# Interval (in seconds) between successive checks of the job's state
# (when waiting for the job to start).
wait_time = 5


##############################################
# Settings for qq loop jobs.
##############################################
[loop_jobs]
# Pattern used for naming loop jobs.
pattern = "+%04d"


##############################################
# Settings for Presenter (qq info).
##############################################
[presenter]
# Style used for the keys in job status/info panel.
key_style = "default bold"
# Style used for values in job status/info panel.
value_style = "white"
# Style used for notes in job status/info panel.
notes_style = "grey50"

[presenter.job_status_panel]
# Maximal width of the job status panel.
max_width = null
# Minimal width of the job status panel.
min_width = 60
# Style of the border lines.
border_style = "white"
# Style of the title.
title_style = "white bold"

[presenter.full_info_panel]
# Maximal width of the job info panel.
max_width = null
# Minimal width of the job info panel.
min_width = 80
# Style of the border lines.
border_style = "white"
# Style of the title.
title_style = "white bold"
# Style of the separators between individual sections of the panel.
rule_style = "white"


##############################################
# Settings for JobsPresenter (qq jobs/stat).
##############################################
[jobs_presenter]
# Maximal width of the jobs panel.
max_width = null
# Minimal width of the jobs panel.
min_width = 80
# Maximum displayed length of a job name before truncation.
max_job_name_length = 20
# Maximum displayed length of working nodes before truncation.
max_nodes_length = 40
# Style used for border lines.
border_style = "white"
# Style used for the title.
title_style = "white bold"
# Style used for table headers.
headers_style = "default"
# Style used for table values.
main_style = "white"
# Style used for job statistics.
secondary_style = "grey70"
# Style used for extra notes.
extra_info_style = "grey50"
# Style used for strong warning messages.
strong_warning_style = "bright_red"
# Style used for mild warning messages.
mild_warning_style = "bright_yellow"
# List of columns to show in the output.
# If not set, the settings for the current batch system will be used.
columns_to_show = null
# Code used to signify "total jobs".
sum_jobs_code = "Σ"


##############################################
# Settings for QueuesPresenter (qq queues).
##############################################
[queues_presenter]
# Maximal width of the queues panel.
max_width = null
# Minimal width of the queues panel.
min_width = 80
# Style used for border lines.
border_style = "white"
# Style used for the title.
title_style = "white bold"
# Style used for table headers.
headers_style = "default"

# Style used for the mark if the queue is available.
available_mark_style = "bright_green"
# Style used for the mark if the queue is not available.
unavailable_mark_style = "bright_red"
# Style used for the mark if the queue is dangling.
dangling_mark_style = "bright_yellow"

# Style used for information about main queues.
main_text_style = "white"
# Style used for information about reroutings.
rerouted_text_style = "grey50"

# Code used to signify "other jobs".
other_jobs_code = "O"
# Code used to signify "total jobs".
sum_jobs_code = "Σ"


##############################################
# Settings for NodesPresenter (qq nodes).
##############################################
[nodes_presenter]
# Maximal width of the nodes panel.
max_width = null
# Minimal width of the nodes panel.
min_width = 80
# Maximal width of the shared properties section.
max_props_panel_width = 40
# Style used for border lines.
border_style = "white"
# Style used for the title.
title_style = "white bold"
# Style used for table headers.
headers_style = "default"
# Style of the separators between individual sections of the panel.
rule_style = "white"
# Name to use for the leftover nodes that were not assigned to any group.
others_group_name = "other"
# Name to use for the group if it contains all nodes.
all_nodes_group_name = "all nodes"

# Style used for main information about the nodes.
main_text_style = "white"
# Style used for statistics and shared properties.
secondary_text_style = "grey70"
# Style used for the mark and resources if the node is free.
free_node_style = "bright_green bold"
# Style used for the mark and resources if the node is partially free.
part_free_node_style = "green"
# Style used for the mark and resources if the node is busy.
busy_node_style = "blue"
# Style used for all information about unavailable nodes.
unavailable_node_style = "bright_red"


##############################################
# Date and time format strings.
##############################################
[date_formats]
# Standard date format used by qq.
standard = "%Y-%m-%d %H:%M:%S"
# Date format used by PBS Pro.
pbs = "%a %b %d %H:%M:%S %Y"
# Date format used by Slurm.
slurm = "%Y-%m-%dT%H:%M:%S"


##############################################
# Exit codes used for various errors.
##############################################
[exit_codes]
# Returned when a qq script is run outside the qq environment.
not_qq_env = 90
# Default error code for failures of qq commands or most errors in the qq environment.
default = 91
# Returned when a qq job fails and its error state cannot be written to the qq info file.
qq_run_fatal = 92
# Returned when a qq job fails due to a communication error between qq services.
qq_run_communication = 93
# Used by job scripts to signal that a loop job should not be resubmitted.
qq_run_no_resubmit = 95
# Returned on an unexpected or unhandled error.
unexpected_error = 99


##############################################
# Color scheme for states display.
##############################################
[state_colors]
# Style used for queued jobs.
queued = "bright_magenta"
# Style used for held jobs.
held = "bright_magenta"
# Style used for suspended jobs.
suspended = "bright_black"
# Style used for waiting jobs.
waiting = "bright_magenta"
# Style used for running jobs.
running = "bright_blue"
# Style used for booting jobs.
booting = "bright_cyan"
# Style used for killed jobs.
killed = "bright_red"
# Style used for failed jobs.
failed = "bright_red"
# Style used for finished jobs.
finished = "bright_green"
# Style used for exiting jobs.
exiting = "bright_yellow"
# Style used for jobs in an inconsistent state.
in_an_inconsistent_state = "grey70"
# Style used for jobs in an unknown state.
unknown = "grey70"
# Style used whenever a summary of jobs is provided.
sum = "white"
# Style used for "other" job states.
other = "grey70"


##############################################
# Options associated with the Size dataclass.
##############################################
[size]
# Maximal relative error acceptable when rounding Size values for display.
max_rounding_error = 0.1


##############################################
# Options associated with PBS.
##############################################
[pbs_options]
# Name of the subdirectory inside SCRATCHDIR used as the job's working directory.
scratch_dir_inner = "main"


##############################################
# Options associated with Slurm.
##############################################
[slurm_options]
# Maximal number of threads used to collect information about jobs using scontrol.
jobs_scontrol_nthreads = 8


##############################################
# Options associated with Slurm on IT4I clusters.
##############################################
[slurm_it4i_options]
# Number of attempts when preparing a working directory on scratch.
scratch_dir_attempts = 3


##############################################
# Options associated with Slurm on LUMI.
##############################################
[slurm_lumi_options]
# Number of attempts when preparing a working directory on scratch.
scratch_dir_attempts = 3


##############################################
# General configuration
##############################################
# Name of the qq binary.
binary_name = "qq"
Run scripts
The qq GitHub repository provides several ready-to-use scripts for running Gromacs simulations in loops — similar to Infinity’s precycle scripts.
These scripts are compatible with all qq-supported clusters, including Metacentrum-family clusters, Karolina, and LUMI. Do not forget to load Gromacs from the module appropriate for the given cluster.
For LUMI users: If you are using full nodes on the LUMI's GPU queues, the run scripts may require some modifications to get solid performance (see here).
qq_loop_md
A job script for running single-directory Gromacs simulations in loops.
Start by preparing a directory containing all necessary input files, and place qq_loop_md inside it.
In your .mdp file, specify the number of simulation steps to perform in each cycle. In the body of the script, set the total number of cycles to run (using the qq loop-end directive), define input filenames, specify the Gromacs module to load, and optionally adjust the number of MPI ranks and OpenMP threads to use. By default, qq assigns one MPI rank per CPU core. If any GPUs are requested, one MPI rank per GPU is used and the remaining CPU cores are distributed among the MPI ranks as OpenMP threads.
Once ready, submit the job with qq submit. The first cycle will be submitted and executed, and before it finishes, qq will automatically submit the next cycle. Read more about qq loop jobs here.
The total simulation length after all cycles finish equals: (steps per cycle in the .mdp file) × (number of cycles).
qq_flex_md
A job script for running single-directory Gromacs simulations in flexible-length loops.
This script works similarly to qq_loop_md, but here the .mdp file specifies the total number of simulation steps to perform. Each cycle runs until it either exhausts its walltime or reaches the specified total number of steps. When a cycle ends, the script checks whether the target step count has been reached; if not, it automatically submits the next cycle. As a result, each cycle may have a different duration.
The total simulation length after all cycles finish corresponds to the number of steps specified in the .mdp file.
qq_loop_re
A job script for running multi-directory Gromacs simulations in loops. It functions like qq_loop_md, but instead of a single simulation, it manages multiple simulations across several subdirectories.
Place qq_loop_re in the parent directory containing your subdirectories. In the script body, specify the naming pattern for the subdirectories (e.g., win for win01, win02, ..., win42, etc.).
This script is typically used for replica exchange simulations (hence the re in its name). You can thus also set the exchange attempt frequency and choose whether to perform Hamiltonian replica exchange. You can also use the script to run multiple-walker metadynamics or AWH.
Note that by default, qq_loop_re and qq_flex_re scripts use a single MPI rank per GPU (if requested) or per CPU core.
The total simulation length after all cycles finish equals: (steps per cycle in the .mdp file) × (number of cycles).
qq_flex_re
A job script for running multi-directory Gromacs simulations in flexible-length loops — essentially a hybrid of qq_loop_re and qq_flex_md.
Each cycle runs until it reaches the specified total number of steps or the walltime limit, automatically submitting the next cycle if needed.
The total simulation length after all cycles finish equals the number of steps specified in the .mdp file.
Prolonging the simulations
After your simulations finish, you may find that you want them to continue for a bit longer.
qq_loop_md / qq_loop_re
Prolonging simulations run with qq_loop_* scripts is straightforward. Increase the value in the # qq loop-end ... directive to extend the total number of cycles, then submit the loop script again using qq submit. You do not need to remove the runtime files in the directory. The loop job will resume from the next cycle.
qq_flex_md / qq_flex_re
Prolonging simulations run with qq_flex_* scripts is a bit more involved: you must extend the Gromacs tpr file (or files, in the case of qq_flex_re) to include more simulation time.
You can do this with:
gmx_mpi convert-tpr -s storage/md<NEXT_CYCLE_NUMBER>.tpr -until <TOTAL_SIMULATION_RUN> -o storage/md<NEXT_CYCLE_NUMBER>.tpr
<NEXT_CYCLE_NUMBER> is the number of the next cycle of the loop job. <TOTAL_SIMULATION_RUN> is the new total simulation time in picoseconds. See the documentation of gmx convert-tpr for more details.
If you are using qq_flex_re, you must update tpr files for all clients created for the next cycle in the storage directory. Their names follow this format:
md<NEXT_CYCLE_NUMBER>-<DIRECTORY_IDENTIFIER>.tpr
Once the tpr files are updated, simply submit the flex script again using qq submit. You do not need to remove the runtime files in the directory.
Using qq in Python
qq is built on top of qq_lib, a Python library that exposes core qq functionality programmatically. You can install qq_lib to integrate qq workflows directly into your Python scripts.
The recommended way to use qq_lib is to use the uv package manager.
To add qq_lib to your project:
uv add git+https://github.com/Ladme/qq.git --tag v0.6.0
Alternatively, you can add it directly to a specific script:
uv add git+https://github.com/Ladme/qq.git --tag v0.6.0 --script [YOUR_SCRIPT].py
Then import qq classes and utilities in your Python code:
from qq_lib.info import Informer
from qq_lib.kill import Killer
And use them:
informer = Informer.fromFile("my_job.qqinfo")
print(informer.getRealState())

killer = Killer.fromInformer(informer)
killer.kill()
See the Python API documentation for details on available modules, classes, and functions.
Official qq scripts
qq offers several official helper scripts built on top of qq_lib. These tools automate common workflows—especially useful when running many Gromacs simulations—but are not part of core qq functionality. You can find them in the qq GitHub repository.
Again, the recommended approach is to use the uv package manager. If you have uv installed, download the script, make it executable (chmod u+x SCRIPT), and run it (./SCRIPT). If you use the scripts frequently, consider adding their directory to your PATH.
gmx-eta
gmx-eta estimates the remaining runtime of a Gromacs simulation. Run it in a directory containing a qq job, or supply a specific job ID.
Usage
usage: gmx-eta [-h] [job_id]

Get the estimated time of a Gromacs simulation finishing.

positional arguments:
  job_id                Job ID. Optional.

options:
  -h, --help            show this help message and exit
Example
$ gmx-eta 12345
Simulation will finish in 06:41:07.
Note:
gmx-etarequires that your Gromacsgmx mdruncommand is executed with the-vflag.
multi-check
multi-check scans multiple directories for qq jobs and reports their collective status. It uses multithreading to significantly speed up job-state inspection compared to checking jobs individually.
Usage
usage: multi-check [-h] [-t THREADS] [--fix] directories [directories ...]

Check the state of qq jobs in multiple directories.

positional arguments:
  directories           Directories containing qq info files.

options:
  -h, --help            show this help message and exit
  -t, --threads THREADS Number of worker threads (default: 16)
  --fix                 Resubmit all failed and killed jobs.
Example check
$ multi-check win??

Collecting job states ━━━━━━━━━━━━━━━━━━━━━━━━━━━━━━━━━━━━━━━━ 100% 0:00:00

FAILED          4
win05 win06 win07 win08

FINISHED        3
win45 win48 win49

QUEUED          35
win01 win02 win03 win04 win09 win10 win11 win12 win13 win14 win15 win16 win17 win18 win20 win21 win22 win23 win24 win25 win26 win27 win28 win29 win30 win31 win32 win33 win34 win35 win36 win38 win39 win42 win43

RUNNING         9
win19 win37 win40 win41 win44 win46 win47 win50 win51

TOTAL           51
You may also use --fix to automatically attempt to fix and resubmit jobs in FAILED or KILLED states. Jobs are submitted with the same parameters originally used.
Example fix
$ multi-check win?? --fix

Collecting job states ━━━━━━━━━━━━━━━━━━━━━━━━━━━━━━━━━━━━━━━━ 100% 0:00:00

FAILED          4
win05 win06 win07 win08

FINISHED        3
win45 win48 win49

QUEUED          35
win01 win02 win03 win04 win09 win10 win11 win12 win13 win14 win15 win16 win17 win18 win20 win21 win22 win23 win24 win25 win26 win27 win28 win29 win30 win31 win32 win33 win34 win35 win36 win38 win39 win42 win43

RUNNING         9
win19 win37 win40 win41 win44 win46 win47 win50 win51

TOTAL           51

***********************************

Fixing jobs ━━━━━━━━━━━━━━━━━━━━━━━━━━━━━━━━━━━━━━━━ 100% 0:00:00

FIXED SUCCESSFULLY        4
win05 win06 win07 win08

COULD NOT FIX             0
multi-submit
multi-submit submits qq jobs from multiple directories in bulk. All jobs must use the same submission script name and request identical resources. The resource specification from the first submitted job is applied to all others.
Usage
usage: multi-submit [-h] script directories [directories ...]

Submit qq jobs from multiple directories. All jobs must request the same resources!

positional arguments:
  script                Name of the script to submit.
  directories           Directories containing qq info files.

options:
  -h, --help            show this help message and exit
Example
$ multi-submit qq_loop_md win?? -q default --ncpus=8 --walltime=12h

Submitting jobs ━━━━━━━━━━━━━━━━━━━━━━━━━━━━━━━━━━━━━━━━ 100% 0:00:00

SUBMITTED SUCCESSFULLY    51
win01 win02 win03 win04 win05 win06 win07 win08 win09 win10 win11 win12 win13 win14 win15 win16 win17 win18 win19 win20 win21 win22 win23 win24 win25 win26 win27 win28 win29 win30 win31 win32 win33 win34 win35 win36 win37 win38 win39 win40 win41 win42 win43 win44 win45 win46 win47 win48 win49 win50 win51

COULD NOT SUBMIT          0
multi-kill
multi-kill terminates qq jobs across multiple directories in parallel. Because it uses multithreading, it is significantly faster than running qq kill for each job independently.
Usage
usage: multi-kill [-h] [-t THREADS] directories [directories ...]

Kill qq jobs in multiple directories.

positional arguments:
  directories           Directories containing qq info files.

options:
  -h, --help            show this help message and exit
  -t, --threads THREADS
                        Number of worker threads (default: 16)
Example
$ multi-kill win??
Killing jobs ━━━━━━━━━━━━━━━━━━━━━━━━━━━━━━━━━━━━━━━━ 100% 0:00:00

KILLED SUCCESSFULLY       51
win01 win02 win03 win04 win05 win06 win07 win08 win09 win10 win11 win12 win13 win14 win15 win16 win17 win18 win19 win20 win21 win22 win23 win24 win25 win26 win27 win28 win29 win30 win31 win32 win33 win34 win35 win36 win37 win38 win39 win40 win41 win42 win43 win44 win45 win46 win47 win48 win49 win50 win51

COULD NOT KILL            0
Glossary
-
compute node – Computer where a job can be executed.
-
input directory – Directory from which the job is submitted. Contains the qq info file.
-
job directory – See "input directory".
-
loop job – Job which submits its continuation right before finishing [see more].
-
main working node – Working node (see below) responsible for managing a job.
-
qq info file – YAML-formatted file containing information about a qq job. Necessary for performing operations with the qq job. Located in the input directory.
-
qq job – Job of the batch system submitted using
qq submit. -
standard job – Default qq job [see more].
-
submission directory – See "input directory".
-
work(ing) directory – Directory where the job is being executed [see more].
-
working node – Compute node where the job is being (or has been) executed.